IMTS Preview: Nikon Metrology

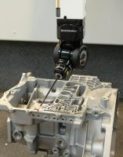
Nikon Metrology CMMs leverage the productivity gains offered by Renishaw's five-axis REVO probe system. REVO is a dynamic probe system designed to maximize CMM throughput by providing improved accuracy, faster measurement and greater flexibility. With an optimum stiffness-to-weight advantage, Nikon Metrology's ceramic CMMs take full advantage of the performance enhancements offered by REVO for automotive powertrain and aerospace engine applications among many others.
REVO is an infinite-positioning, 2-axis probe head utilizing a beam of laser light directed from the probe body down a hollow carbon fiber stylus to a reflector at the stylus tip. Thanks to this direct measurement of the stylus tip position, REVO delivers consistent accuracy through a range of stylus lengths up to 500 mm. By using synchronized head and machine movement when scanning, REVO enables measurement speeds up to 500 mm/s and 4,000 points/second without affecting the accuracy of the REVO. Five-axis motion allows the probe to re-position as the CMM moves to the next feature. Fewer CMM moves, head positions and stylus changes are required to measure the part. REVO typically reduces CMM cycle times by 30-80 percent compared with other tactile probes.
Infinite positioning of the REVO probe head, with a resolution of under 0.1 μm at the tip of a 250 mm long stylus, provides unparalleled access to difficult to measure features such as partially concealed faces, undercuts and compound features. The combination of rapid touch points, high speed scanning, offset styli and surface finish measurement from the same probe, permits access to features that would previously have required complex stylus configurations and greater CMM working volume, both of which can be detrimental to cost.
Inspection cycle times are a key decision factor for performance critical applications such as automotive powertrain and aero engine components, however REVO offers other benefits. High resolution scanning, typically 6,000 points per revolution in a bore of 100 mm, significantly improves the repeatability of size and location tolerances in cylinder block inspection. While stylus lengths up to 500 mm provide access to measure deep bores and pockets. By dynamically adapting the probe head position to match the alignment of the physical part, REVO eliminates the errors caused when the shank of the stylus touches the part during measurement.
To achieve an astonishing 500 mm/s scanning speed while maintaining premium accuracy during 5-axis scanning, all system components including probe head, controller and CMM need to deliver peak performance and work harmoniously. The ceramic technology used in the Nikon Metrology LK V and LK V SL CMM series offers a suitable stiffness-to-weight ratio enabling higher scan speeds without compromising accuracy. Ceramic technology minimizes dynamic errors during fast movements while maintaining CMM accuracy between calibration periods. This makes the Nikon Metrology CMM the most suitable platform for rapid fixe-axis scanning.
The support of the Renishaw REVO probing system fits with the Nikon Metrology multi-sensor strategy. By offering a combination of contact and non-contact probing systems, customers can choose the right probing system for their application. While the Nikon Metrology laser scanners offer high-speed surface and feature inspection, the REVO system is better suited for the inspection of deep bores and intricate features typically found in automotive powertrain and aerospace engines. The REVO can also be retrofitted to many existing CMMs for increased productivity on current systems


