An overview of tactile and optical metrology
Optical gear metrology
Gears are characterized by a rather complex geometry and tight tolerances, especially compared to other mechanical components. Looking into noise performance of gears, form tolerances are in the single micrometer range to ensure a quiet running behavior. Combined with the geometrical complexity, this is a major challenge for any new metrology standard to be established. For all features and their tolerances, the measuring system must be statistically capable to ensure appropriate accuracy and repeatability. With today’s tactile measuring system, there are measuring devices available that meet nearly all the requirements. Tactile metrology is characterized by a high accuracy and repeatability as well as a high flexibility. However, for some applications measuring times are rather high, particularly if compared to production cycling times.
Non-contact optical systems offer the possibility to bring more speed into the measurement process. Faster measuring results will bring two major advantages. The first and obvious advantage is reducing the measuring costs. Nevertheless, the second and equally important advantage is the reduction of the setup time in production. Faster measuring results of the first part of a batch help to release the processes sooner, improving the output and overall efficiency of the production equipment.
The gear geometry, with its small pressure angles and therefore steep flanks, create a challenge for optical systems in combination with the tight tolerances. In the past optical systems were focused on bringing more information (such as flank topographies) in short time while compromising on statistical capability. This can be an important feature for R&D but not for production.
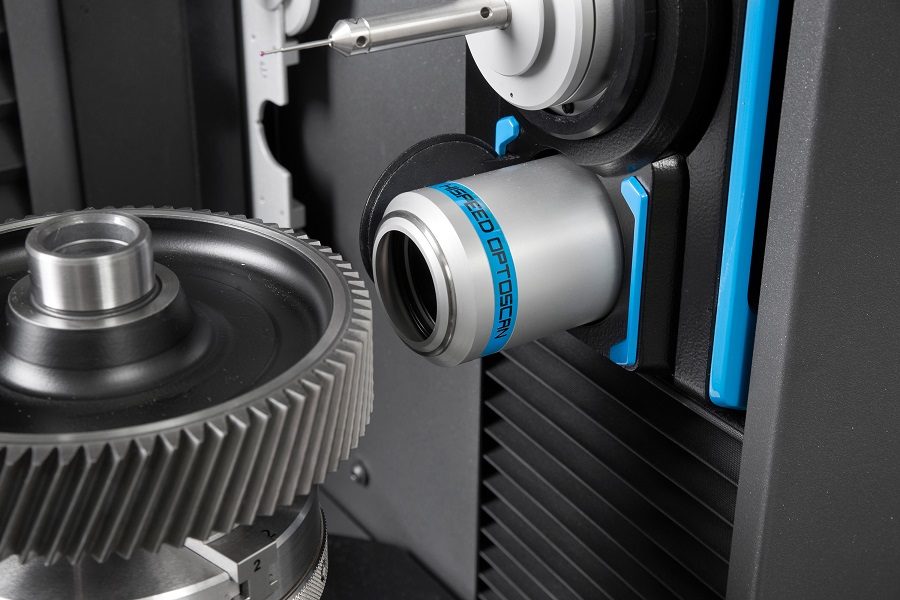
With Klingelnberg Hybrid Metrology a different approach is taken. It combines the best out of the two worlds. The tactile NANOSCAN is applied where the most flexible and robust system is needed. The HISPEED OPTOSCAN optical sensor is used where measuring speed can be gained without any disadvantages. The combination of both systems ensures fast and statistically capable measuring results.
With Klingelnberg Hybrid Metrology the focus is performance

In serial measurement of a cylindrical gear, the profile and lead are typically measured on three or four teeth, and pitch measurement is performed on all teeth. This tactile pitch measurement necessarily involves inserting the stylus into each gap to get in direct physical contact to both flanks of the teeth. With optical measurement, by contrast, only light enters contactless into the tooth gap. Accordingly, pitch measurement offers a great potential for reducing the measurement time. Through optical pitch measurement using one continuous, uninterrupted rotation of the component, the measurement time advantage increases with large numbers of teeth to up to 80 percent while reducing the wear of the tactile stylus. This optical pitch measurement can be combined with the tactile measurement of profile and lead or other features for example using the tactile roughness system. Overall, the total measurement time can be decreases by up to 40 percent. Thus, in cases where there is a high utilization rate of the measuring machine, the costs for the optical metrology option are quickly recovered. The technology therefore makes a significant contribution to reducing quality costs in the first step. In addition, Klingelnberg Hybrid Metrology will evolve in the near future, adding more optical measurement solutions.
Decreased measurement time is not the only key factor
Just as important is a high achievable accuracy of the measuring results, even in the case of extremely complex gears with ground surfaces and steep profile angles. This is the result of intensive optimization of Klingelnberg’s own sensor technology, the analysis algorithms, and the measurement strategy. The only difference in operation is that optical pitch measurement must be selected in the same cylindrical gear measurement software customers are already familiar with. The measuring run is automatically modified accordingly, and the pitch measurement is performed with the optical sensor. The changeover between the tactile 3D NANOSCAN probing system and the optical HISPEED OPTOSCAN sensor takes place automatically within approximately 1.5 seconds in conjunction with the entire measuring run.
In terms of achievable measurement time advantage, one thing is true: The more teeth there are, the bigger the advantage is.
About the authors:

Dr. Christof Gorgels is the head of the metrology business unit at Klingelnberg. Responsibilities include R&D and after sales.

Markus Finkeldey is project manager of optical metrology at Klingelnberg. Responsibilities include the operative and strategic controlling of the optical metrology section in Klingelnberg’s Hybrid Metrology approach.


