The new topography proposed here is able to exploit both linear and parabolic topography properties since it is a linear relief with a parabolic fillet, as shown in Figure 2. The topography shown here has never been found by the authors in the technical literature.
 Figure 2(a)--Tip relief profile modification definition. Figure 2(b)--Example of pinion-gear tip relief modification and K-chart combination.
Transmission error produced by the modification pattern of Figure 2 is shown in Figure 3, along with a fast fourier transform analysis of TE. In Figure 3(b), the mean value of the TE signal is eliminated, first frequency component is predominant, and it is remarkable that with higher load, PPTE and first frequency amplitude can be smaller than with lower load.
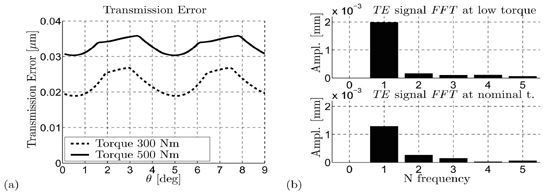 Figure 3(a)--TE at low torque and nominal torque applied. Figure 3(b)--Fast Fourier Transform (FFT) of the TE signal, both cases.
As discussed, PPTE can be effectively considered as the main parameter of TE roughness (Ref. 8).
The tool exploited to find the optimum tip relief configuration is a map plotting PPTE as a function of start relief roll angles ΘP and ΘG for fixed profile modification magnitudes at the top veP and veG.
Methodology
The methodology proposed by the authors (Ref. 8) is applied here.
Simulations of meshing gears have been carried out by means of a hybrid method, combining the finite element technique with a semi-analytical solution (Refs. 15, 16).
The main assumptions for the analysis are the following:
- Plain strain conditions suggested by the spur gear geometry (high ratio b/h). Two-dimensional plane strain analysis is adequate for this kind of tooth. Moreover, the two-dimensional version of the software requires little time both for model generation and simulations, with very precise results.
- Static analysis.Static TE was determined while neglecting rotational speed and inertia forces. This is the main assumption; undertaking dynamic analysis is too time consuming.
- Friction neglected. It is assumed that it has little effect on TE output.
- Space error and pitch error not considered. No statistical consideration was included in the analysis.
The quantities veP (veG) and ΘP (ΘG) are defined in Figure 1(b). The ranges for both of these two variables are the start of active profile roll angle (SAP) and the end of active profile roll angle (EAP) for each gear, as shown in Figure 1(c).
Research Boundaries
Corner contact boundary. Corner contact is produced when the contact region includes zones of the fillet of the tooth tip (Ref. 17). As a consequence of tooth deflection,the effective contact ratio is greater than that found according to rigid geometry. Hypothesis: The contact pressure rises locally at the tip fillet, as shown in Figure 4.
 Figure 4(a)--No corner contact detected. Figure 4(b)--Corner contact detected.
This definition of corner contact can be exploited if an FEM analysis is performed. When the corner contact is detected, the calculated pressure peak was not considered reliable since the maximum is strongly affected by the radius of the fillet, which is a very unpredictable quantity.
High curvature boundary. There is also the possibility of getting an anomalous contact condition if the tip relief is too high along the tooth profile. In this condition,high curvature occurs and then contact pressure is expected to be much higher than the Hertz model according to the nominal involute curvature.
In Figure 5, three contact pressure histories are shown in which only linear-parabolic profile modification parameters are modified.
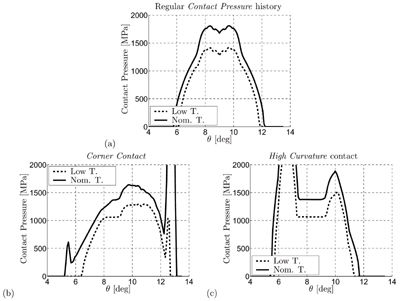 Figure 5(a)--Regular contact pressure history configuration. Figure 5(b)--Corner contact configuration. Figure 5(c)--High curvature configuration.
For each case, two load conditions (nominal and low load) are shown in comparison. It is worth noting that corner contact is related to torque versus tip relief, so configuration can show corner contact if the load is high enough. This is obviously detectable only if loaded tooth contact analysis (LTCA) is considered.
PPTE Maps
This paper’s main result is to obtain PPTE maps in order to find the minimum inside an acceptance domain defined according to contact pressure. Maps hereafter presented plot PPTE as a function of tip relief start roll angles (ΘP, ΘG), which are strongly PPTE-dependent parameters, for a given quantity of material removed at the top (veP, veG). Initial values of veP and veG have to be related to the nominal torque of the gear set even though they are also strongly PPTE-dependent (Refs. 8-11).
To define completely the linear-parabolic modification (ΘP, ΘG) and (veP, veG) is not enough; the transition from parabolic to linear point roll angles needs to be defined (ΘpP, ΘpG) (see Figure 2(a)).
It is clear that:
 (1)
(1)
To let the transition from linear to parabolic be described in natural fashion,configurations at fixed ratios are considered in singular maps.
 (2)
(2)
Limit configurations are λP(G) = 0 (linear modification) and λP(G) = 1 (parabolic modification). Maps with λ ranging from 0 up to 1 are reported hereafter.
Computational Performances
To perform parameter sensitivity analysis, a common PC platform was used with the following characteristics:
- CPU 2.6 GHz
- RAM 1 GB
Plane strain analysis was performed by ExtPair2D TM (Refs. 18, 19). Analyses were automatically performed in about 4.5 CPU hours, simulating 50 time steps for each meshing, for 225 different tip relief (ΘP, ΘG) configurations.
Results
The aforementioned methodology was applied to a low contact ratio (LCR) gear set. The main parameters of the set are reported in Table 1.
| Table 1--LCR gear set design parameters. |
| Modulus |
1.75 mm |
Pressure angle |
22.5° |
| Pinion N. teeth |
80 |
Gear N. teeth |
80 |
| Pinion external diameter |
143.2 mm |
Gear external diameter |
43.2 mm |
| Pinion root diameter |
135.3 mm |
Gear root diameter |
135.3 mm |
| Pinion face width |
11.0 mm |
Gear face width |
11.0 mm |
| Pinion veP
|
23.3 |
Gear veG
|
23.3 |
For the equal number of the set, several symmetry properties are expected. Configurations analyzed are reported in Table 2.
| Table 2--Profile modification ratios and analysis of configurations. |
| λP(G)
|
0 |
1/4 |
2/4 |
3/4 |
1 |
| 0 |
(Lin) |
|
|
|
|
| 1/4 |
|
(1-1) |
(1-2) |
(1-3) |
|
| 2/4 |
|
(2-1) |
(2-2) |
(2-3) |
|
| 3/4 |
|
(3-1) |
(3-2) |
(3-3) |
|
| 1 |
|
|
|
|
(Par) |
Two load conditions applied to the gear set were considered in this article:
- 300 Nm--considered a low load for the gear set,
- 500 Nm--nominal load for the gear set.
Nominal load
For nominal torque, the effect on PPTE of the migration from linear to parabolic topography is depicted in Figure 6.
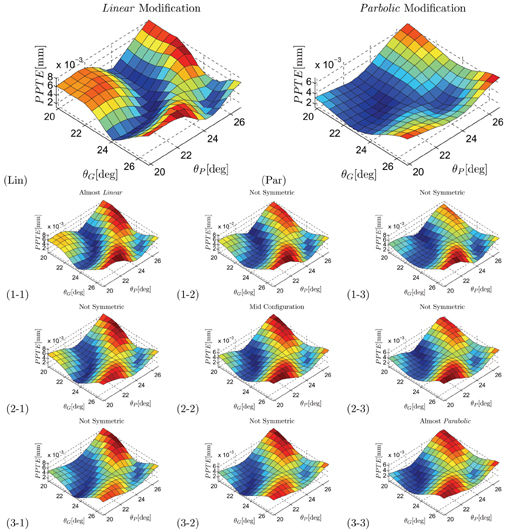 Figure 6--Nominal load (Lin) PPTE obtained with linear modification topography. (Par) PPTE obtained with parabolic modification topography. Intermediate configuration meshing conditions shown in (1-2), (1-3), (2-1), (2-3), (3-1) and (3-2).
Furthermore, boundaries were applied. Results are reported only for symmetric configurations in Figure 7.
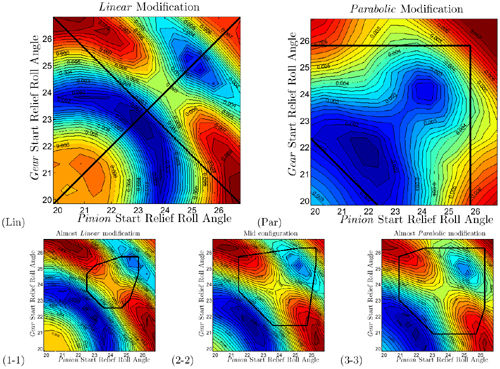 Figure 7--Nominal load (Lin) linear modification. No boundary can consistently be applied. (Par) parabolic modification, boundaries are wider. Intermediate configurations shown in (1-1), (2-2) and (3-3).
When searching the minimum inside boundary, it is clear that parabolic modification is the one that offers a wider acceptance domain. Therefore, larger areas in which PPTE produces an absolute minimum can be considered. Minimum values for configurations shown in Figure 7 are reported in Table 3, not considering boundaries.
Among minimum values reported in Table 3, only the one referring to parabolic modification is acceptable. Though others are lower, they fall outside the boundary. Taking boundary into account, parabolic modification leads to the best result.
| Table 3--Minimum PPTE values at the nominal load. |
| (LIN)1.14 µm |
| (1-1) 0.63 µm |
(2-2) 0.76 µm |
(3-3) 0.57 µm |
| (Par) 1.39 µm |
In Figure 8, a transmission error trace is reported both for parabolic optimum (continuous line) and for mid-configuration minimum PPTE configuration. PPTE is lower for mid-configuration, but edge contact is evident. Indeed, this configuration falls outside the acceptance boundary as shown in Figure 7.
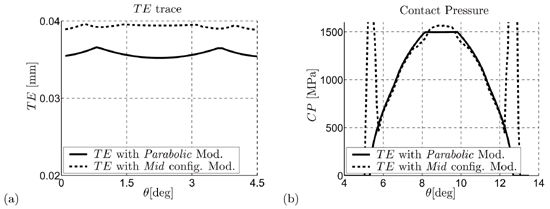 Figure 8(a)--Parabolic optimum TE trace. Figure 8(b)--Mid-configuration linear with parabolic fillet optimum TE trace.
Low Load
For low torque, the migration from linear to parabolic topography is depicted in Figure 9. For this load level, no boundary related to contact pressure was applied since load is not expected to be dangerous at this level. Even though there are also necessary conditions of anomalous contact (edge contact or high curvature) at lower load, it is possible to assume that they are confined to useless configurations. Minimum values found at the different configurations are reported in Table 4.
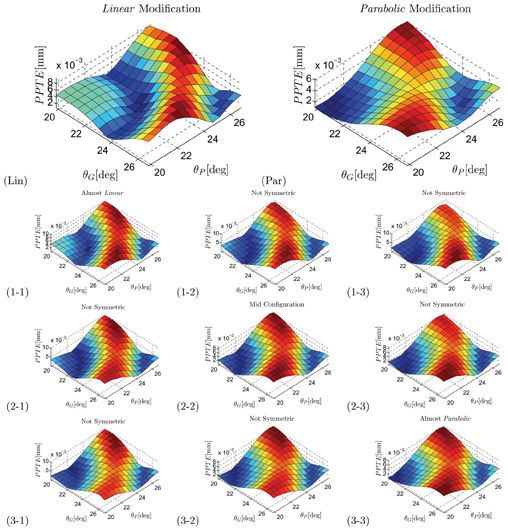 Figure 9--Low load: (Lin) PPTE obtained with linear modification topography. (Par) PPTE obtained with parabolic modification topography. Intermediate configuration meshing conditions shown in (1-2), (1-3), (2-1), (2-3), (3-1) and (3-2).
| Table 4--Minimum PPTE values at the low load. |
| (Lin) 0.87 µm |
| (1-1) 0.39 µm |
(2-2) 0.53 µm |
(3-3) 0.52 µm |
| (Par) 0.95 µm |
It is worth noting that neither linear nor parabolic topography generates minimum PPTE at both loads.
In the configuration proposed here, minimum PPTE output is generated by a linear with parabolic fillet configuration. However, the optimum is dependent on the load. Therefore, the aim of this article is not to propose this result as a "golden" rule, but to show that the parabolic fillet can be an effective parameter for obtaining an optimum solution.
Sensitivity to Center Distance
In order to avoid a huge amount of graphical output, sensitivity to center distance offset is considered for linear modification at nominal load. Results are shown in Figure 10.
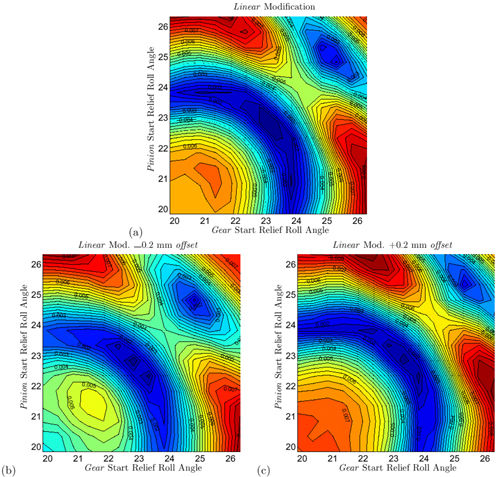 Figure 10(a)--Linear modification. Figure 10(b)--Linear modification with offset -0.2 mm. Figure 10(c)--Linear modification with offset +0.2 mm.
The entities of offset are around ±0.2 mm. In comparison with modulus, it is clear that perturbations induced by the meshing condition have an influence on the PPTE map.
Conclusions
In this article, a new tip relief profile modification is proposed along with loaded tooth contact analysis methodology. Static peak-to-peak transmission error is considered as the main meshing output since it can be related to noise level. Extensive parametric numerical analysis results are presented. PPTE maps are reported as a function of pinion and gear start of tip relief roll angles. Migration from linear to parabolic modification is effectively described.
Contact pressure anomalies are presented and applied as limits of acceptance on PPTE maps. Modifications that are close to parabolic can show a wider acceptance domain, since edge contact and strong curvature issues are less dangerous.
The optimum configuration is found here for a gear set at a given load. The new topography introduces a degree of freedom that can be useful in designing optimum profile modifications for any gear set.
Simulations are performed with the aim of gear contact dedicated tools produced by Advanced Numerical Solutions (ANSol).
The authors are grateful to Dr. Sandeep M. Vijayakar, head of ANSol, for his large support to the development of the work.
This article is printed with permission of the publisher from VDI-Gessellschaft Entwicklung, Konstruction, Vertieb (Editor); International Conference on Gears, Vol. 2. VDI-Berichte 1904. VDI-Verlag, Düsseldorf, Germany 2006, pp. 1719-1734 (first publication).
References
1. Smith, J.D. Gears and Their Vibration, A Basic Approach to Understanding Gear Noise. The Macmillan Press Ltd., 1983.
2. Harris, S. "Dynamic Loads on the Teeth of Spur Gears." ProcIMechE, (1958) 3, pp. 172-187.
3. Munro, R.G., N. Yildirim, D.M. Hall. "Optimum Profile Relief and Transmission Error in Spur Gears." Proceedings of the First International Conference on Gearbox Noise and Vibration, 1990, pp. 35-41.
4. Niemann, G., and H. Winter. Machinenelemente Band II, Getriebe Allgemain, Ahnradgetriebe, volume 2. Grundlagen, Stirnradgetriebe, SpringerVerlag, Berlin, 1983.
5. Niemann G., and J. Baethge. Transmission Error Tooth Stiffness and Noise of Parallel Axis Gears. VDIZ, 112(4), 1970.
6. Walker, H. "Gear Tooth Deflections and Profile Modifications." Engineer, (1938). pp. 409-412, 434-436.
7. Litvin, F.L. and A. Fuentes. "Gear Geometry and Applied Theory." Cambridge University Press, 2004.
8. Beghini, M., F. Presicce and C. Santus. "A Method to Define Profile Modification of Spur Gear and Minimize the Transmission Error." Proceedings of AGMA Fall Technical Meeting 2004. Milwaukee, WI.
9. Wagaj, P.and A. Kahraman. "Impact of Tooth Profile Modifications on the Transmission Error Excitation of Helical Gear Pairs." Proceedings of ESDA2002: 6th Biennial Conference on Engineering Systems Design and Analysis, July 2002. Istanbul, Turkey.
10. Kartik, V.and D.R. Houser. "Analytical Predictions for the Transmission Error Excitation in Various Multiple Mesh Gear Trains." Proceedings of DETC ’2003. ASME Design Engineering Technical Conferences and Computers and Information in Engineering Conferences, 2003.
11. Tavakoli, M.S. and D.R. Houser. "Optimum Profile Modification for the Minimization of Static Transmission Errors of Spur Gears." Proceedings of ASME 84-DET-173, 1986.
12. Geiser, H. "Noise Optimized Modifications: Renaissance of the Generating Grinders," Proceedings of AGMA Fall Technical Meeting 2004, October 2004, Milwaukee, WI.
13. Johnson, K.L. Contact Mechanics. Cambridge University Press, 1985.
14. Beghini, M., G.M. Bragallini, F. Presicce and C. Santus. "Influence of the Linear Tip Relief Modification in Spur Gears and Experimental Evidence." Proceedings of ICEM12, September 2004, Bari.
15. Vijayakar, S.M.and D.R. Houser. "Contact Analysis of Gears Using a Combined Finite Element and Surface Integral Method," Proceedings of AGMA Technical Meeting, 1991.
16. Vijayakar, S.M., D.R. Houser and H.R. Busby. "A Summary of a New Finite Element Technique with Special Application to Gears." Proceedings of Int. Conf. of Gearing, (1988), Vol. 2, pp. 813-817.
17. Litvin, F.L., A. Fuentes, I. Gonzalez-Perez, L. Carvenali, K. Kawasaki, and R.F. Handschuh. "Modified Involute Helical Gears: Computerized Design, Simulation of Meshing and Stress Analysis." Computer Methods in Applied Mechanics and Engineering, (2003) 192 pp. 3619-3655.
18. Vijayakar, S.M. Calyx Users Manual. Advanced Numerical Solutions, Hilliard, OH, March 2003.
19. Vijayakar, S.M. Helical3D User’s Manual. Advanced Numerical Solutions, Hilliard, OH, March 2003.
Ciro Santus is assistant professor in the department of mechanics at the University of Pisa in Pisa, Italy. Currently, he is researching various aspects of machine design.Santus has worked extensively in FEM simulation in gears and contact mechanics. He has an advanced degree in mechanical engineering and a Ph.D. in metal fatigue related to oil drilling technology.
Fabio Presicce is an engineer for Selex Corp., a Finmeccanica company. His main responsibilities include developing hardware engineering requirements in avionics technology and human-machine interface systems. Presicce has also worked extensively in aerospace gear transmission applications in flight controls and human-machine interface systems.
Marco Beghini is a professor in the mechanical department at the University of Pisa. He has twenty years’ experience in material and mechanical component analysis and design as well as several years’ collaboration with Avio SpA in testing, analysis and design of gear transmissions for aeronautical applications.
Comment on this article by sending e-mail to publisher@geartechnology.com


 Figure 1(a)--Definition of the roll angle Θ. Figure 1(b)--Definitions of: profile modification v = v(Θ) as function of the roll angle, the total thickness at the end of the flank either for pinion v
 Figure 2(a)--Tip relief profile modification definition. Figure 2(b)--Example of pinion-gear tip relief modification and K-chart combination.
 Figure 3(a)--TE at low torque and nominal torque applied. Figure 3(b)--Fast Fourier Transform (FFT) of the TE signal, both cases.
 Figure 4(a)--No corner contact detected. Figure 4(b)--Corner contact detected.
 Figure 5(a)--Regular contact pressure history configuration. Figure 5(b)--Corner contact configuration. Figure 5(c)--High curvature configuration.
 (1)
(1) (2)
(2) Figure 6--Nominal load (Lin) PPTE obtained with linear modification topography. (Par) PPTE obtained with parabolic modification topography. Intermediate configuration meshing conditions shown in (1-2), (1-3), (2-1), (2-3), (3-1) and (3-2).
 Figure 7--Nominal load (Lin) linear modification. No boundary can consistently be applied. (Par) parabolic modification, boundaries are wider. Intermediate configurations shown in (1-1), (2-2) and (3-3).
 Figure 8(a)--Parabolic optimum TE trace. Figure 8(b)--Mid-configuration linear with parabolic fillet optimum TE trace.
 Figure 9--Low load: (Lin) PPTE obtained with linear modification topography. (Par) PPTE obtained with parabolic modification topography. Intermediate configuration meshing conditions shown in (1-2), (1-3), (2-1), (2-3), (3-1) and (3-2).
 Figure 10(a)--Linear modification. Figure 10(b)--Linear modification with offset -0.2 mm. Figure 10(c)--Linear modification with offset +0.2 mm.