Enhancement through Shot Peening
Shot peening is an established technology used for inducing residual compressive stress at the
surface of metal components. The residual stress is a function of the hardness/strength properties of the gear surface such that heat treatment plays a significant role in the resultant residual compressive stress profile.
For applications subject to mechanical fatigue loading, residual stresses are additive with applied stresses. The applied bending stress of a gear root is reduced by the amount of residual compression induced from the shot peen process. Shot peening modifies the residual stress distribution at the outer surface, which is usually the initiation site of a typical fatigue failure. The typical location of a bending failure for a gear is the transition/tangent point
between the gear root and gear flank.
For gearing applications, the process is most commonly accomplished with steel shot media in
the size range of 0.007-0.046"ø (0.18-1.17 mm ø). The shot media should be fully hardened to 55-62 HRC for maximum compressive magnitude and depth properties. Reduced hardness media (45-52
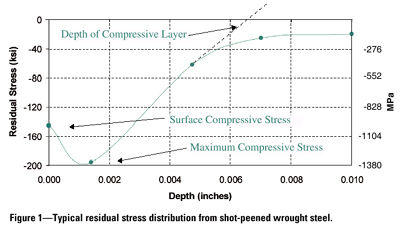
HRC) is available when tooth flank surface finish is a concern. Figure 1 shows a typical residual stress distribution of a carburized, fully hardened wrought gear steel that has been shot peened with fully hardened shot.

It should be noted that the curve does not cross the neutral axis such that the surface residual compressive stresses are balanced with sub-surface residual tensile stresses for static rebalancing. The reason is that the carburized layer (which is significantly deeper than the shot peen layer) has residual compression prior to the shot peening. The static rebalancing would occur much deeper than what is shown in Figure 1. A dashed line is shown to represent the depth of the shot peen layer by extending the curve from its positively sloping portion.
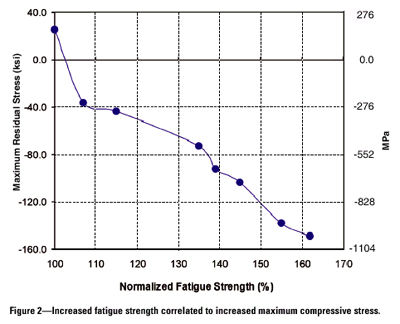
It is generally accepted for most gearing applications that bending fatigue strength improves with increasing residual compression. Figure 2 demonstrates the trend of improved bending fatigue with increasing residual compressive stress. Figure 2 is a compilation of results using carburized 20MnCr5 in single tooth pulsator tests. The gears were 8.0 mm module with 20 teeth (Ref. 3).

All results in Figure 2 are normalized to 100% on the horizontal axis. The graph shows that the highest magnitude of residual compression (~150 ksi or 1,035 MPa) showed an increase in
fatigue strength of approximately 60% when compared to the baseline (100%), which had approximately 25 ksi (173 MPa) of residual tension.
As stated previously, the residual stress induced from the shot peening is heavily influenced by the properties of the material being peened. This applies to both wrought steel and P/M gears. Applying this principle to P/M components, this means that shot peening will produce more compressive stress on higher hardness and higher density P/M components, resulting in optimum load carrying properties. Lower density P/M components will still respond with compressive stress. However, they will lack the strength to retain higher magnitudes of compressive stress.
Discussion of Test Data
This section will present available test data on shot peening of powder metal gears. Several different types of data are presented, including tooth root bending fatigue data. This fatigue data was acquired using single tooth pulsator (STP) tests.
It ought to be noted that fatigue strength data from STP tests should be adjusted downward as the specific tooth (teeth) that were tested are not necessarily the weakest on the gear. In power recirculation tests, which are more applicable to real life conditions (and more expensive to perform), the weakest tooth always fails. Test results indicate a downward adjustment to ~80% of the STP testing improvement would be realistic (Ref. 4).
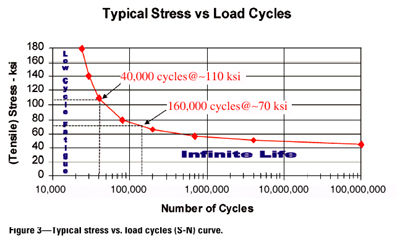
The principles of fatigue failure should also be mentioned. A typical S-N curve plots the applied stress versus number of cycles. The higher the number of cycles prior to shot peening, the greater the enhancement with the addition of shot peening. This is because shot peening lowers the net stress experienced at the surface of the gear. A reduced net stress theoretically brings the resultant stress closer to the endurance limit. Figure 3 (which does not apply to any specific material or application) demonstrates this concept.

Using this principle, one could assume that if fatigue strength results were analyzed (before and after shot peening) at 500,000 cycles compared with 2 million cycles, the percent improvement would not be as significant. If fatigue strength were analyzed at 4 million cycles (compared with 2 million cycles), theoretically the fatigue strength improvement should be greater.
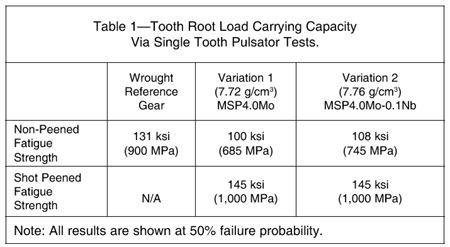
Case study #1. The German Federal Ministry of Education and Research tested powder metal alloys and their suitability for gearing applications. MSP4.0Mo-based powder metal gear alloys were tested against 20MnCr5 case hardened, wrought steel gears. Tooth root load carrying capacity tests were performed using single tooth pulsator tests at 2 million cycles. All gears had modules of 3.5 mm. The results are shown in Table 1 (Ref.5).

The above test study shows a decrease of ~20% (25% & 18% respectively) when comparing the non-
peened powder metal variations to the non-peened wrought reference gear. With the addition of shot peening, both examples exceeded the wrought reference gear by ~9%.
Assuming an average 104 ksi (100 & 108 ksi) fatigue strength prior to shot peening of the non-
peened powder metal variations and 145 ksi with the addition of shot peening, the fatigue strength improvement is ~39%. With the previously mentioned STP-to-power recirculation adjustment, the shot peened value can be changed to ~136 ksi (a 31% improvement) for calculated service requirements.
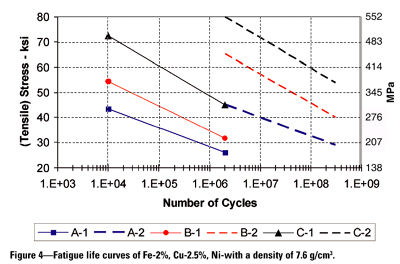
Case study #2. Another test study was performed on P/M test bars with a machined radius acting as a stress concentration (stress factor, K=1.49). The material was Fe-2%, Cu-2.5%, Ni- with a density of 7.6 g/cm3. Tests were performed under both uniform and variable loading. In addition to varying test loads, the test matrix examined various sintering
treatments. Figure 4 depicts the results. Below the figure is an explanation of the curves labeled in the legend of the graph (Ref. 6).

-A-1: As Sintered, Constant Loading
-A-2: As Sintered, Variable Loading
-B-1: Sintered & Shot Peened, Constant Loading
-B-2: Sintered & Shot Peened, Variable Loading
-C-1: Sintered, Carbonitrided & Shot Peened, Constant Loading
-C-2: Sintered & Shot Peened, Variable Loading
Note: All shot peening performed to a 0.016" A intensity.
These data support the theory that harder, higher strength materials achieve better fatigue performance as they are able to retain higher magnitudes of residual compressive stress. When comparing the constant loading conditions at 1 million cycles, the as-sintered (A-1) condition has a fatigue strength of ~28 ksi (193 MPa). When carbonitrided and shot peened (C-1), the fatigue strength increases to ~48 ksi (331 MPa), a 71% improvement.
Case study #3. Fe-Mo P/M alloy gears at a density of 7.5 g/cm3 were tested at an endurance limit of 3 million cycles. The gears were hardened to 60 HRC and shot peened (0.016" A intensity) with fully hardened 62 HRC shot. The following results are from single tooth loading (Ref. 7).
- Sintered & Case Hardened (baseline): 130 ksi (900 MPa)
- Sintered, Case Hardened & Ground: 112 ksi (770 MPa)
- Sintered, Case Hardened & Shot Peened: 149 ksi (1,030 MPa)
Shot peening improved the baseline condition by 19 ksi (~15%). It is worth noting that the
endurance limit of the gear tooth roots that were ground decreased 18 ksi (~14%) from the baseline condition. It is generally believed that a smoother surface will respond better under fatigue conditions because potential crack initiation sites are assumed to be eliminated. What is sometimes neglected is the fact that grinding under certain circumstances can introduce residual tensile stresses if not properly controlled. Residual tensile stresses will act to accelerate a fatigue failure as they are additive with applied tensile stresses. It is believed this is what
contributed to the decrease in fatigue life, however this was not the focus of this study.
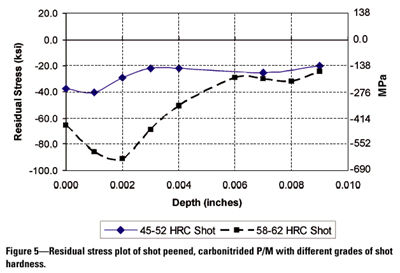
Case study #4. Residual stress comparisons were made between shot peening a hardened surface with different grades of shot hardness. A carbonitrided, powder metal Fe-1.5% alloy (density=7.4 g/cm3) surface was shot peened with fully hardened and regular hardness shot media. Figure 5 shows the residual stress comparison (Ref. 6).

It should be noted that both curves do not cross the neutral axis due to residual compression created from the carbonitriding process prior to shot peening. Figure 5 shows significantly more residual compression when using a harder shot media. Although bending fatigue tests for comparing the two were not available, the residual stress from the shot of higher hardness would most likely produce better results in bending fatigue.
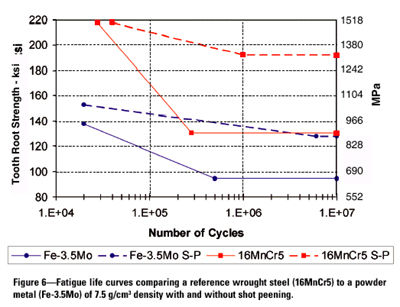
Case study #5. Tooth root bending fatigue studies were performed using pulsator tests to compare a reference wrought gear to a powder metal gear that has a density of 7.5 g/cm3. Both gears had 3.5 mm modules, 25 teeth and were case hardened to 60 HRC. The wrought gear was a 16MnCr5 steel and the powder metal gear was Fe-3.5Mo alloy content.
In Figure 6, the powder metal gear results are depicted with the blue curves. The endurance limit improved ~35% with the addition of shot peening. The endurance limit improved from ~95 ksi (650 MPa) to ~128 ksi (880 MPa). The endurance limit of the shot peened powder metal compares very closely with the non-peened 16MnCr5 material. Shot peening was performed at 0.013" A intensity (0.32 mm A intensity) for all samples.

In Figure 6, the reference 16MnCr5 steel gear results are depicted with the red curves. The endurance limit improved ~45% with the addition of shot peening. The tooth root strength was ~131 ksi before shot peening and ~190 ksi after shot peening. Since the non-peened steel gear has a higher strength than the non-peened powder metal gear, the 16MnCr5 is able to retain more residual compression from shot peening, resulting in more overall improvement in fatigue strength from shot peening.
Using the previously mentioned STP-to-power recirculation adjustment, the endurance strength
improvements can be changed to ~29% (from ~35%) for the powder metal gears and to ~36%
(from ~45%) for the wrought steel gear (Ref. 8).
Case study #6. Via bending fatigue tests, powder forged C-0.5%, Cu-2% components with a density of 7.82 g/cm3 had a fatigue strength 27% greater than the non-peened counterparts (at 90% reliability levels)(Ref. 9). It should be noted that the components in this test were automotive connecting rods, not gears. They were included as part of this paper because they were made from high density P/M and the failure mode was bending fatigue, which is the subject of all other case studies presented in this paper.
Conclusion
The growth of the powder metal market is directly a function of the available applications
it can serve with its current cost advantages. The current market for gearing covers a broad spectrum from non-critical, low load applications to critical, high load applications. The P/M gear market is naturally limited by its mechanical performance capability.
Recent improvements in the manufacturing technologies of powder metal have allowed it to be considered for higher strength gear applications. Higher bending strength P/M applications are highly predicated on higher densities and subsequent heat treating and metal finishing operations.
Typical high load gear applications are susceptible to bending fatigue failure in the gear tooth root. Shot peening is a recognized process to induce residual compressive stress. It is also highly dependent on P/M density and heat treatment. Test data were presented to support the consideration of P/M bending fatigue strength improvements through the use of shot peening. P/M gears (even with shot peening) offer significant cost advantages over their wrought steel counterparts.
This paper was presented at the ASME/AGMA 2003 International Power Transmission and Gearing Conference, held Sept. 3-5, 2003, in Chicago, IL, and was published in Proceedings
of the 2003 ASME Design Engineering Technical Conferences & Computers and Information in
Engineering Conference. It’s republished here with permission from ASME.
References
1. Jones, P.K. "Advances in High Performance Powder Metallurgy Applications," 2001
International Conference on Power Transmission Components, Oct. 16-17, 2001, Ypsilanti, MI.
2. Lawcock, R., K. Buckley-Golder and D. Sarafinchan. "Testing of High Endurance PM Steels
for Automotive Transmission Gearing Components," SAE Paper 1999-01-0293, SAE International
Congress & Exposition, Detroit, MI, March 1999.
3. Shaw, B.A., A.M. Korsunsky and J.T.Evans. "Surface Treatments and Residual Stress Effects
on the Fatigue Strength of Carburised Gears," University of Newcastle-upon-Tyne, United
Kingdom, 2001.
4. Rao, S.B., and D.R. McPherson. "Experimental Characterization of Bending Fatigue Strength in Gear Teeth," PennState Drivetrain Technology Center Newsletter, Vol. 5, No. 1, 2002, State
College, PA, pp. 2-4.
5. Link, R. and G. Kotthoff. "Suitability of High Density Powder Metal Gears for Gear Applications," Gear Technology, Vol. 18, No. 1, Jan/Feb 2001, pp. 15-18.
6. Sonsino, C., G. Schlieper and W. Huppmann. "How to Improve Fatigue Properties of Sintered
Steels by Combined Mechanical and Thermal Surface Treatments," Modern Developments in Powder
Metallurgy Vol. 16, 1985, Metal Powder Industries Federation, Princeton, NJ, pp. 33-49.
7. Strehl, R. "Tooth Root Fatigue of a High Density Gear," Technical University of Aachen, Germany, 1997.
8. Strehl, R. "Load Capacity of Gears Made From High Strength Powder Metal Steel," Doctorate thesis study, Technical University of Aachen, Germany, 2001.
9. Chernenkoff, R., S. Mocarski and D. Yeager. "Increased Fatigue Strength of Powder-Forged
Connecting Rods by Optimized Shot Peening," SAE International Congress and Exposition, 1995,
Detroit, MI.
David J. Breuer is a manager of OEM accounts with Metal Improvement Co., a shot peening and heat treating company headquartered in Paramus, NJ. A mechanical engineer, he has worked for MIC as a divisional and regional sales manager for the company’s shot peening facilities. Breuer has written several papers related to shot peening, which have been presented at technical conferences and printed in technical publications. In addition, he wrote Shot Peening Applications--Eighth Edition.


