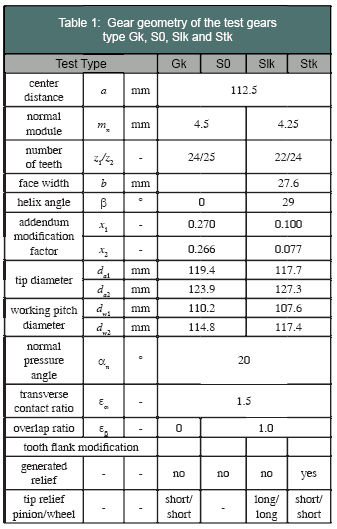
The gear type Gk corresponds to the gear type of FVA 284 Ib (Ref. 12) and, except for a small lengthwise crowning on the pinion, the reference gear of FVA 284 I/II (Ref. 10). Hence this gear type is used to verify the results with the spur gears of FVA 284/I and 284 Ib. The helical gear type S0 has no modifications, except for a small lengthwise crowning on the pinion. Type Slk has a long tip relief on the pinion and wheel to achieve uniform pressure on the line of contact. The gear type Stk is modified with a generated relief and a short tip relief for optimally uniform pressure distribution. The necessary modifications were determined according to the calculation method in Reference 11, which is based on the pressure distribution calculated with the program RIKOR G (Ref. 8). The whole calculation is included in the program RIKOR H (Ref. 7).
The test gears are made from case-hardened steel 18CrNiMo7-6. The gears were case-carburized and ground after the teeth were cut. The case depth conformed to Eht ˜ 0.15·mn according to DIN 3990–Part 5.
Measuring Gear Quality
The test gears were measured on a Höfler/Klingelnberg EMZ 402 3D-coordinate measuring machine. The quality was determined according to DIN 3960 by measuring the profile along the involute and across the flank, as well as measuring the pitch deviation and the true running. The quality of all test gears averaged a value better than DIN 5.
All test gears had a flank roughness of Ra = 0.2 … 0.3 µm. Such a smooth flank roughness minimizes micropitting risk and its influence on the pitting load capacity.
Test Rig
All pitting tests were run in FZG back-to-back test rigs with a center distance a = 112.5 mm (Fig. 2). These test rigs have a closed-power circuit with helical slave gears. Both test rigs are equipped with a speed controller in a range of n = 50… 3,100 min-1. The helical hand of the slave and test gears is designed to cancel the axial forces on each shaft.
Figure 2—FZG back-to-back test rig with a= 112.5 mm.
Test Conditions
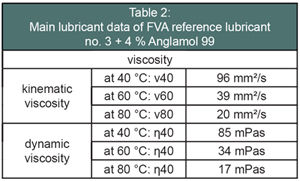
According to the test conditions in Reference 4, the tests were run with constant load until the pitting area exceeded 4% of the active flank area of one tooth, or until a maximum running time of 50·10^6 load cycles on the pinion. All test gears were run in for 6,000 load cycles on the pinion, with a normal contact stress of sH0 H = 1,000 N/mm2, and 18,000 load cycles on the pinion with sH0 H = 1,200 N/mm2. The pinion speed was n1 = 100 min-1. Test lubricant was the FVA-referenced oil No. 3 mixed with four percent Anglamol 99. Table 2 shows the lubricant viscosity. The lubricant was injected in the gear mesh with a temperature of 60°C and a volume flow of Qe = 2–3 l/min. All tests were run with a driving pinion and driven wheel. The pinion speed was n1 = 3,000 min-1. Consequently, the circumferential speed at the pitch point was vt = 17.3 m/s for type Gk and vt = 16.9 m/s for S0, Slk and Stk.
Evaluation of the Test Results
Figure 3 shows the contact stress sH1 calculated according to ISO 6336-2 and based on the fatigue-endurable torque for 50% failure probability. The results are shown in Figure 3. Figure 4 shows the fatigue-endurable torques on the pinion of the four gear types—Gk, S0, Slk and Stk—which have the same transverse contact ratio of ea = 1.5. In comparison to the referenced spur gear Gk, the best modified helical gear type Stk transmits approximately 32% higher torque, while the endurance contact stress according to ISO 6336-2 is 11% lower. Without flank modifications (gear type S0), the increase of torque is about eight percent compared to the spur gear reference; the endurance contact stress according to ISO 6336-2 is 19% lower.
Figure 3—Experimentally determined endurance contact stress sH1 for 50% failure probability, according to ISO 6336–2.
Figure 4—Fatigue-endurable torque on pinion T 1 of the tested gear types Gk, S0, Slk and Stk.
Summary of test results:
- Helical gears with equal transverse contact ratio transfer a higher torque than spur gears.
- For helical gears, the experimentally determined endurance contact stress sH is smaller than the value calculated according to ISO 6336-2.
- Tooth flank modifications that give uniform stress distribution increase the pitting load capacity.
New DIN/ISO-Compatible Calculation Method
Following is a practical calculation method. This method is independent of a calculated pressure distribution, and compatible with the actual ISO 6336-2/DIN 3990–Part 2. Since the maximum contact stress is approximated with simple equations, the pitting load capacity can be determined. It is planned to consider this calculation method in the new ISO 6336-2 as method B.
In FVA 284 I/II, a calculation method was developed, based on the knowledge of the local contact stresses. This method is described in Reference 11.
The modernized calculation method presented here is called RV II (Rechenverfahren II), and uses double-signed variables like s"H0 H . The actual ISO 6336-2 uses no signed variables; e.g., sH.
Nominal contact stress s"H0 H .
 (1)
(1)
defines the basic value s"H0 H used in calculation method II (RV II):
The factors Z H , Z E and Ze are identical to the same factors in ISO 6336-2.
Factor Z"ß. According to ISO 6336-2, Z ß is calculated with:

Based on the results of the research projects 284 I/II (Ref. 10), 284 Ib (Ref. 12) and the present research program, the factor Z"ß is redefined as

Z"ß is an empirical factor, which takes the research results for helical gears and theoretical thoughts into account. For gears with only a small helix angle, the factor Z"ß should be similar to the factor Z ß , according to ISO 6336-2. This factor is valid for helix angles between 0° and 35°. The factor Z"ß is shown in Figure 5.

Figure 5—Helix angle factor Z" Z B according to Equation 2 in comparison to Z B according to ISO 6336–2.
Contact stress s"H. The contact stress s"H is calculated according to Equation 3. Compared to the nominal contact stress s"H0 H , the contact stress s"H considers stress increasing influences resulting from non-uniform load distribution, additional dynamic force and so on.

The load factors K A , K V , K H ß and K H a Ha are the same as in the actual ISO 6336-1.
Factor Z"B/D. The single-pair tooth contact factor Z"B/D considers that the relevant contact stress for pitting is not necessarily that of the pitch point. With Equation 4, the factor Z"B/D can be calculated to estimate the maximum contact stress.

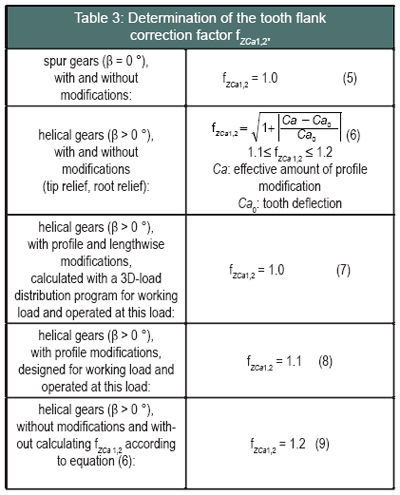
With Z B/D according to ISO 6336-2 and f ZCa1,2 according to equations 5,6,7,8 or 9 (Table 3).

The factor Z B/D is from ISO 6336-2. The contact stress of point B (inner point of single contact) is important for spur gears. So for spur gears the factor Z B/D " is the same as the factor Z B/D , according to ISO 6336-2. In this case the factor f ZCa 1,2 is 1.0 (Table 3). Thus the calculation method for spur gears remains unchanged.
Factor f ZCa . The tooth flank correction factors f ZCa 1,2 for pinion and wheel consider the higher contact stress at the beginning and the end of the path of contact for helical gears, for the case where there are inadequate tooth flank modifications. Table 3 describes the determination of the tooth flank correction factor.
The tooth flank correction factor f ZCa depends on the load and considers inadequate tooth flank modifications through comparison of the existing and required tooth flank modifications. Here only the amount of profile modifications is taken into account, but an adequate length of the modifications is required. If the whole flank topology is to be considered, the calculation method according to Reference 11 can be used.
For spur gears, the tooth flank correction factor f ZCa 1,2 is 1.0. Hence it is assumed that the contact stress of the inner point of single contact (B) is higher than the contact stress of the starting point (A) with double-tooth contact, which is the usual case for practical spur gears.
If helical gears have no tooth modifications or only standard modifications—like tip or root relief—the factor f ZCa 1,2 is calculated according to Equation 6.
The value ranges from 1.1 to 1.2. For helical gears with adequate tooth modifications, which cause maximum contact stress near the pitch circle, the factor f ZCa 1,2 is 1.0. These adequate tooth modifications are normally generated. For helical gears with tooth modifications designed for the working load and operated at working load, the factor f ZCa 1,2 is 1.1. For helical gears without modifications a tooth flank correction factor f ZCa 1,2 = 1.2 can be estimated.
Existing and required profile modifications. The amount of profile modification Ca in Equation 6 is the actual profile modification on the tooth flank in microns. Ca0 is the required amount of profile modification in microns for having the maximum contact stress around the pitch point, not at the beginning or the end of the path of contact. The required profile modification can be calculated according to the manufacturer’s experience or recommendations, according to Niemann/Winter (Ref. 6), Sigg (Ref. 9) or Equation 10.

The factor Ca0 depends on the load for all recommendations. According to Equation 10, the required profile modification is calculated by the nominal tangential load Ft, the face width b and the stiffness c?, according to ISO 6336-1.
Applying the New DIN/ISOCompatible Calculation Method
The following contact stresses are calculated from the fatigue-endurable torque. Figure 6 shows the contact stresses on pinion sH1 of the test gears according to ISO 6336-2, as well as the contact stress s"H1, as determined by the new ISO-compatible calculation method RV II. Obviously the calculation method RV II gives the same contact stress for the spur gear as ISO 6336-2. However, for helical gears a higher contact stress is calculated.

Figure 6—Contact stress according to ISO 6336–2 and to the new calculation method RV II.
The contact stresses of the different gear types sH1 according to ISO 6336-2 range in a spread of ± 11% of the mean value. According to RV II, the contact stresses s"H1 range in a spread of ± 2% of the mean value. Especially for the helical gears with practice-relevant modifications (Slk and Stk), the calculated contact stresses (RV II) are nearly the same as the contact stress of the spur gear.
Consequently the new calculation method RV II corresponds better to test results than the ISO 6336-2 calculation method.
Theoretical Study to Determine the Influence of Helix Angle on the Endured Torque
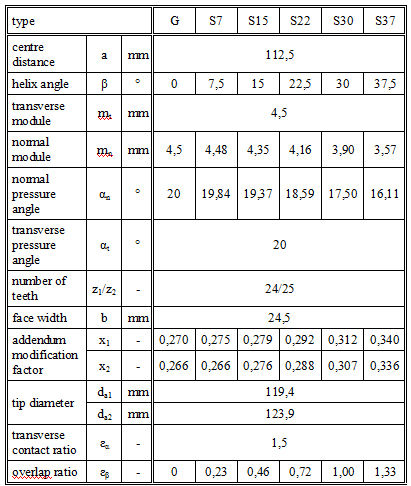
The following study estimates the permissible torque as a function of the helix angle according to the new calculation method. Therefore the contact stresses according to RV II for six different gears (Table 4) were calculated. All gears have the same center distance, face width, transverse pressure angle, transverse module, number of teeth, transverse contact ratio and constant tip diameter. The permissible contact stress is the same as in ISO 6336-2.

The maximum endurable torque can be determined for the condition where the contact stress according to the new calculation method is equal to the permissible contact stress according to ISO 6336-2:

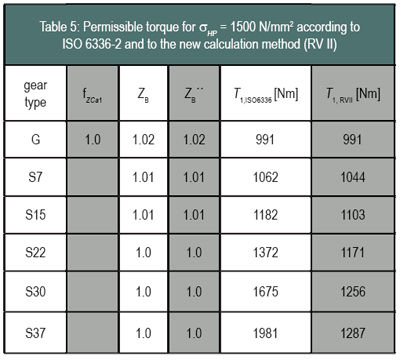
A permissible contact stress of sHP = 1,500 N/mm² is assumed for all gears. The load factors and f ZCa 1 are set to 1.0 (Kges = K A · Kv· K H ß· K H a Ha = 1.0 and f ZCa 1 = 1.0).
Consequently, it is assumed that all helical gears have uniform load distribution, resulting from adequate flank modifications. The calculated torque T 1 on the pinion and the main factors according to the new calculation method are printed in Table 5, and the permissible torques are shown in Figure 7. Obviously, the permissible torque increases with increasing helix angle. In comparison to the spur gear (G), the helical gear S30, with a helix angle of 30°, has a 30% higher calculated torque.

Figure 7—Permissible torque according to ISO 6336–2 and to the new calculation method RV II.

Conclusions
The results of the experimental part of this research project prove that the calculation of the contact stress according to ISO 6336-2/DIN 3990–Part 2 isn’t accurate for helical gears.
Hence a new calculation method to determine the pitting load capacity was developed. This calculation method is compatible with ISO 6336-2/DIN 3990–Part 2. It takes the maximum contact stress into account and can be used as a new method B. This calculation method, called RV II, treats helical gears more precisely than ISO 6336-2, and is capable of accounting for tooth modifications. For spur gears the new calculation method is equal to ISO 6336-2.
Acknowledgments
The project “Einfluss der örtlichen Hertz´schen Pressung auf die Grübchentragfähigkeit einsatzgehärteter Stirnräder” was funded by the FVA—Forschungsvereinigung Antriebstechnik e.V. (FVA 284 Ic).
References
1. DIN 3990, Teil 2: Tragfähigkeitsbe rechnung von Stirnrädern - Berechnung der Grübchentragfähigkeit. Beuth Verlag Berlin, 1987.
2. Döbereiner, R. Tragfähigkeit von Hochverzahnungen Geringer Schwingungsanregung. FVA-Vorhaben 257, Heft 571, Frankfurt, 1998.
3. Haslinger, K. Untersuchungen zur Grübchen tragfähigkeit Profilkorrigierter Zahnräder. Dissertation TU München, 1991.
4. Hösel T. and J. Goebbelet. Empfehlungen zur Vereinheitlichung von Flankentragfähigkeitsversuchen an Ver Güteten und Gehärteten Zylinderrädern. FVA-Merkblatt Nr. 0/5, Frankfurt, 1979.
5. ISO 6336-2: “Calculation of Load Capacity of Spur and Helical gears—Calculation of Surface Durability (Pitting).” First edition, 1996.
6. Niemann, G. and H. Winter. Maschinenelemente Band II. Springer Verlag Berlin, Heidelberg, New York, London, Paris and Tokyo, 1989.
7. Otto, M. “Ritzelkorrekturprogramm RIKOR H.” FVA Forschungsvorhaben 30/V, Heft 481, 2005.
8. Schinagl, S. “Ritzelkorrekturprogramm RIKOR G.” FVA Forschungsvorhaben 30/IV, Heft 481, 2000.
9. Sigg, H. Profile and Longitudinal Corrections on Involute Gears. Semi Annual Meeting of the AGMA, Paper 109.16, 1965.
10. Stahl, K. and O. Hurasky-Schönwerth. Experimentelle und Theoretische Untersuchungen an Schrägstirnrädern. FVA-Vorhaben 284 I/II, Heft 608, Frankfurt, 2000.
11. Stahl, K. Vorschlag für eine Erweiterte Berechnungsmethode zur Grübchentragfähigkeit Einsatzgehärteter gerad- und Schrägverzahnter Stirnräder. FZG-Bericht 2550, München, 2000.
12. Steinberger, G. DIN-Vergleichstest zur Grübchentragfähigkeit gerad- und Schrägverzahnter Stirnräder. FVAVorhaben 284 Ib, Heft 688, Frankfurt, 2002.




 (1)
(1)


