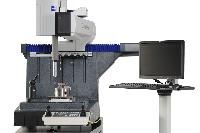
Zeiss Offers DuraMax Gear and ACCURA CMM
With DuraMax, Carl Zeiss offers a compact 3-D coordinate measuring machine. DuraMax Gear transitions DuraMax into a shop floor gear wheel measuring machine. "This enables us to fulfill the requests of many customers and introduce gear wheel measuring technology with small machines that can be used as close to production as possible," says Alexander Dollansky, product manager at Carl Zeiss Industrial Metrology.
The key features of DuraMax Gear are its suitability for a rough production environment, the high permissible temperature fluctuations and its small footprint. DuraMax is suited for process control on the production floor, for quick in-between inspections of small workpieces and for testing volume parts directly in production. Because of its accuracy, DuraMax can also be utilized for many requirements in gear wheel measuring technology. DuraMax Gear comes with the required software and hardware, including stylus material for a broad range of applications. If the product being tested changes, standard inspection procedures often require new, expensive modifications. DuraMax Gear, however, is a CNC all-rounder that, when combined with CAD-based Calypso and Gear Pro involute measuring software, quickly, easily and reproducibly measures all changes. DuraMax Gear is available as a tabletop machine or with an optional base. Its design enables part loading from four sides. With Calypso measuring software and Gear Pro involute, specially developed to measure spur gears, it is now possible to complete all jobs in daily gear measurement. This includes straight and slanted-tooth spur gears, and splines in accordance with the applicable standards. With the Calypso Qs-Stat Out log output option included with delivery, customers are well-equipped to assess processes using a comprehensive, statistical evaluation of quality information relevant to production.
Carl Zeiss also recently introduced the new ACCURA CMM, a multisensor-capable measuring system that permits fast, economical, precise and flexible measurements - primarily due to the use of the latest technologies such as foam insulating technology. As with any versatile modular system, customers can configure the ACCURA to fit their requirements. Based on their current tasks, they select the suitable configuration, i.e. sensors. Special software, such as Gear Pro for gears and Holos Nt for freeform surface measurements, is integrated along with Calypso, the standard CAD-based measuring software from Carl Zeiss. Subsequent modifications can be made very easily. If requirements change, different sensors and software can be easily added. Whether cut, shaped or molded parts, plastic or steel - all options of coordinate measuring technology are available. The ACCURA also permits the integration of Mass technology from Carl Zeiss. Combined with an RDS articulating probe holder, Mass permits the fast, measuring program-guided change between contact sensors and the ViScan and LineScan optical sensors during a CNC run. The contact measuring sensors of the Vast family and the DT single-point sensor can also be used in various configurations.


