According to the German DIN 8589 standards, the definition of grinding is “a machining process with geometrically undefined cutting edges.” That definition, while true in principle (with respect to the intrinsic structure of a grinding wheel), would be false in practice if it were to suggest that grinding is an imprecise process. For example, continuous generating grinding has proven the most productive process for hard-finishing high-precision cylindrical gears; a process based on a dressable, vitrified bonded, threaded grinding wheel called a grinding worm. A process monitoring system (PMS), such as Reishauer’s Argus, stabilizes a machining process even as complex as continuous generating gear grinding.
By evaluating dressing and grinding intensities through real-time analytics and proven algorithms, each ground gear’s dressing and grinding data are captured and stored in a database where they remain entirely traceable. The PMS renders quantitative data transparent and then uses predictive analytics to make qualitative modifications. This technology helps lead toward zero-defect production, greater precision, and definition of those “undefined cutting edges.” The PMS offers comprehensive data analysis possibilities with stored and tracked process and tooling data and individual workpiece identification via DMC (dot matrix code). Preset evaluation limits in the software govern the process interaction and trigger the automatic removal of workpieces that fall outside the set limits.
Continuous Generating Grinding
Continuous generating grinding uses a grinding worm which ensures grinding never takes place in the same spot. Only freshly dressed and unused abrasive grits determine the material removal and the generated gear profile. High-precision diamond rolls profile the worm to maintain constant high-quality manufacture of the gear profiles. This generating process delivers consistent accuracy at high production volumes. However, due to the high output, the use of in-process measuring probes is impossible because gear grinding’s axis movements create rapidly changing contact conditions between the grinding wheel and the workpiece. The wheel generates concomitant force vacillations and features a higher degree of complexity than what is found in cylindrical or surface grinding.
Grinding Process Monitoring
One of the essential features of the generating grinding machine is the high output within a short period. For example, for automotive transmissions, grinding cycle times range from eight seconds for small pinions to one minute for ring gears. For this reason, not all ground parts can be measured by coordinate measuring machines (CMMs) due to the measurement times being much higher than the grinding times and the prohibitive costs this would incur. For this reason, the automotive gear industry relies on sample measurements, which represent only a tiny fraction of the total manufacturing lot, generally not higher than five percent.
The continuous grinding process is considered stable and robust as repeated diamond dressing, and the traversal during grinding guarantees a consistently high level of quality. However, as gears are subjected to ever-increasing quality demands, new testing methods are called for that allow constant monitoring of the grinding process. The sample testing processes used in the automotive gear industry run the risk that unsatisfactory gears may end up inside transmissions. Furthermore, the tactile measuring methods of CMMs are, as a rule, not capable of picking up surface variations on gear flanks that may cause detrimental NVH issues in transmissions.
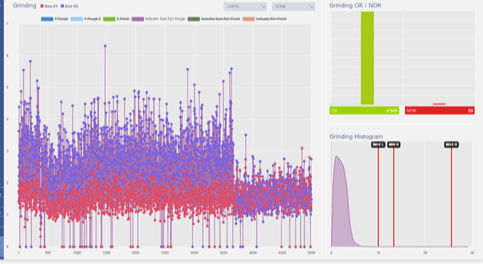
If the grinding intensity generated during the machining process is used as an evaluation criterion, the risk of introducing workpieces of insufficient quality can be eliminated. Real-time analysis of the intensity signal identifies a faulty workpiece during the grinding process if the set signal values have been exceeded. This method translates into a de facto checking of all workpieces in that it allows for faulty workpieces to be automatically identified and removed from the manufacturing process. Reoccurring defective workpieces trigger a systematic error that stops the grinding process and sends a corresponding error message to the operator.
Exceeding the grinding intensity tolerances could be a result of too much or too little grinding stock, hardness distortions, or excessive out-of-roundness from the premachining process. The PMS has integrated sensors to check the dimensions of the premachined gear parts, and excessive out-of-roundness or cumulative pitch errors either lead to an additional grinding stroke or the rejection and removal of the workpiece if the PMS determined additional grinding strokes would not produce a good part.
Grinding intensity is a force-based model — used to calibrate and standardize the grinding process — that continually evaluates the changing chip forming zone, grinding wheel diameter, variations in wheel rpm, and lever ratios across the wheel width in relation to the spindle bearing. This standardization and calibration make it possible to set very narrow limits that result in a high-resolution error evaluation. Even small force vacillations can be detected and automatically checked during the process.
The grinding intensity shows if a worm maintains a consistent cutting performance across its entire width and usable diameter. As a rule, operators evaluate grinding wheels subjectively as empirical data is unavailable. The inhomogeneous hardness variation can only be indirectly assessed via deteriorating gear flank profiles, even though this deterioration may have other causes. The PMS allows the hardness gradient across the grinding wheel width and the changing diameter to be made visible, measurable, and classified.
The grinding intensity also offers an insight into the out-of-roundness levels of clamping fixtures or roundness deviations of the premachined workpieces. For a straightforward interpretation of the dynamics effects of the out-of-roundness of the workpieces on the grinding intensities, the PMS uses proven algorithms to process the time signals captured by the measuring sensors. Using these intensities offers several significant advantages to the operator. The simple interpretability ensures that the analysis of even a complicated process no longer requires the services of highly trained and expensive specialists.
Additionally, even high data volumes generated by large production lots can be visualized. Academic studies are often based on time and frequency analysis of vast data sets with storage reaching several gigabytes. The system’s scalar format of the data parameters makes the graphical representation easy, even with thousands of measured data points. Moreover, the system does not require specific evaluation software and hardware. It can be operated with a simple web application on standard web browsers. Given the small data size, it can be transferred any time via the internet or internal networks, even on networks of small bandwidths, and can be efficiently uploaded or downloaded.
The application of this PMS has significant economic benefits. Besides monitoring geometrical inconsistencies, detecting grinding burns is essential to ensure stable production conditions. Grinding burns must be avoided at all costs. Therefore, one of the most common strategies to prevent thermal damage is to reduce feed rates, as thermal damage thresholds are unknown. However, suppose the grinding intensities are calibrated on ground components and proven free of thermal damage. In that case, the process can be optimized with higher feed rates and lower shifting rates. This process optimization leads to shorter grinding cycle times and increased tool life of grinding wheels and diamond rolls, translating into better process economics. Furthermore, as mentioned in the introduction, the principal aim of the process monitoring system is to achieve zero-error production.
Dressing Process Monitoring
The dressing of grinding wheels is of the highest importance for all grinding processes, and the continuous generating gear grinding process is no exception. The rotating profiled diamond dressing roll transfers the precise profile into the threaded wheel and sharpens the grinding wheel’s grains to ensure sufficient cutting ability. The complete tooth form is created by a generating movement between the threaded wheel and the gear’s movements relative to each other. Even the slightest error in the diamond roll profile is transferred as a mirror image onto the gear profile. Should the diamond roll be blunted by wear, the threaded grinding wheel will in turn be blunted—impeding the cutting ability, leading to low removal rates and possibly grinding burn. To address that, the PMS evaluates the dressing process with force indicators that detect wear on the diamond rolls if the dressing forces exceed a set force envelope.
Moreover, if the threaded grinding wheel features one or several sections of breakage along its threads, it may lead to tooth form deviations. Breakage points show up as force vacillations calculated based on dressing intensity signals. Therefore, wheel breakages can be identified and removed by an additional dressing process. If the breakage were excessive, the system would instruct a grinding wheel change.
Industrial practice often replaces diamond dressing tools when a certain number of predetermined dressing cycles, and therefore a given number of workpieces, has been reached. This practice is often independent of whether the dressing tool may have reached its useful service life or not. However, based on dressing intensity and the resulting indicators of diamond wear, the acceptable limit of the bluntness of a diamond dressing tool can be determined and monitored. For this reason, the useful service life depends on exact measurements and can be utilized more economically over time.
Machine Component Monitoring
Machine tool maintenance is subdivided into two distinct forms: preventive and predictive maintenance. Preventive maintenance is according to a given plan. It is based on time, such as the age of components, guidelines by the component manufacturer, number of axes movements, or other similar established indicators. The PMS is designed to assist in making predictive maintenance decisions that rely on the actual state of components, not on their age or recommended service intervals. On that basis, unnecessary service downtimes and their concomitant costs can be avoided because machine tool services become more predictable and, therefore, more economical. Given stable grinding processes and acceptable premachining, fully functional machine components result in workpieces of higher quality. For this reason, component monitoring significantly contributes to the overall quality assurance process within manufacturing.
Recurring NC testing cycles to measure and evaluate all the relevant grinding machine axes and bearings involved in the process are automatically initiated by the PMS, which enables early detection of electromechanical deviations via sensors that measure vibrations, forces, acoustic signals, and temperature. Maintenance costs are optimized in planning and diagnosis, and some potential EOL gear anomalies may be avoided.
The PMS allows an unbroken recording of all data during the grinding process. Hence, the data can be transferred to a manufacturing execution system (MES), which stores all data free of any time limits. As each workpiece has data sets that include all clamping, dressing, and grinding operations combined with the actual state of each machine component, this may give future insights when the vast amounts of correlated data can be explored with comprehensive data analytics tools. By predicting and analyzing potential NVH issues, the PMS makes complex grinding processes transparent and controllable, carries economic benefits and leads to zero-error production.
reishauer.com/en/technology/argus-monitoring-system
(Additional edits by Aaron Fagan, Senior Editor, Gear Technology and PTE)