In the experience of the authors, in the subject transmissions, special attention must be paid to freedom from cracking (friction cracks) and ade-
quate resistance to erosion and flank fractures.
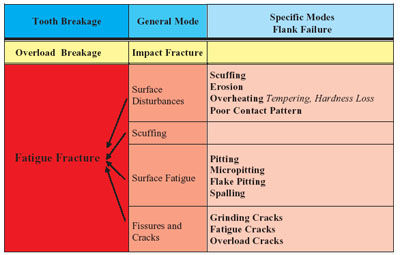
The flank fracture is shown in Figure 2 as a micro section. It originates within the material, predominantly at non-metallic inclusions below the hardened layer and/or in the transition from the hardened exterior to the non-hardened parent metal. The path of the fracture is inclined at 45° to the flank with its point of emergence approximately at the pitch circle. Fractures principally occur in areas of high load concentration. Such areas can result in the shaft during operation under unfavorable stress conditions. Unfavorable stress conditions are thermal stresses in the rotor due, for example, to cold start-ups or uneven temperature distribution over the width of the teeth.
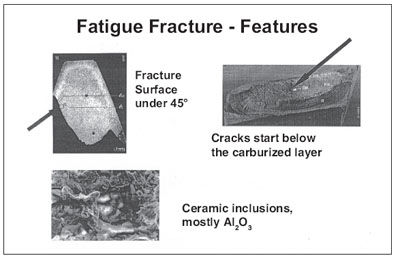
Figure 2—Typical interior fatigue fracture.
Ideas and Recommendations—Methods of Computation
As a matter of principle, the gear tooth design should be computed for:
• Tooth-bending strength.
• Surface durability (pitting).
• Scuffing.
Methods for calculation of the prevention of tooth bending and flank pressure are dealt with at length in AGMA 421.06, API 613 and ISO 13691. AGMA 421.06 was replaced by ANSI/AGMA 6011–G92, and this was again refined by ANSI/AGMA 6011–H98. As regards API 613, in this paper we address API 613 Fifth Edition 2003. Although it is an American national standard, it is applied worldwide. This is the case since there is no standard like DIN 3990 or ISO 6336 exclusively concerned with the computation of gear teeth, but also containing complete design instructions for the transmission, based on experience and failure statistics of machines operating in the field. Modeled closely on API 613 Fifth Edition, the ISO 13691 standard has emerged as an international standard.
For the design of gear teeth, ISO 6336 Parts 1–5 serve as a basis, whereby careful attention must be paid to the fact that transmission size is identical according to both API and ISO. In this way, the API Service Factor also corresponds to the Selection Factor of ISO 13691. In the meantime, since February 2003 there has existed API 613 Fifth Edition, which, conversely, has taken over various aspects from ISO 13691. It thus has a more international character but remains nonetheless a national norm. It is regrettable that both standards compete with each other instead of ISO and API working together to produce an international standard on the subject. The disadvantage of a national standard is that for different countries (i.e., outside the United States), various deviations have to be discussed and accepted during contract negotiations.
For the calculation of scuffing, there are the integral-temperature and the flash-temperature methods, which are dealt with in the Technical Reports ISO/TR 13989-2 and ISO/TR 13989-1. No particular procedure is favored, but the suggestion is to use the procedure with which the transmission builder is most experienced.
Tooth Corrections
To achieve the most even load distribution possible, corrections are necessary in the direction of tooth height and tooth width. In the direction of height, the correction on the tip of the tooth of the driving gear serves to attenuate meshing impact
In the lateral direction, the correction of angle takes account of the deflection and twisting of the rotor as well as the temperature distribution in the teeth over their width and the influence of residual stresses.
The qualitative types of longitudinal corrections are shown in Figures 3a and 3b.
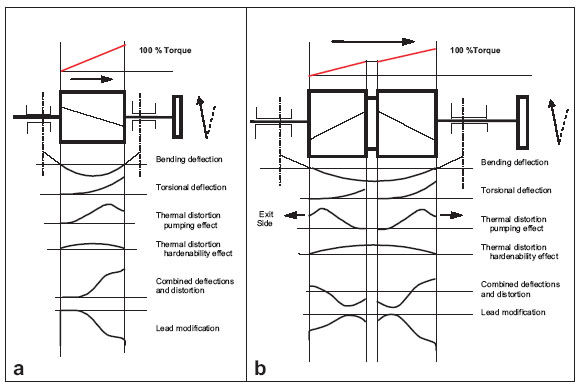
Figure 3a—Lead modification, single-helical gear. Figure 3b—Lead modification, double-helical gear.
(Note: For steels of low hardenability ∆HRC > 8 (hardness difference between HRC40 and the maximum hardness HRC1.5), the thermal deformation which results from the relief of the residual stresses is to be taken into account. The better the hardenability, the flatter will be the hardness line of the Jominy curve and the lower ∆HRC (see Fig. 4a).)
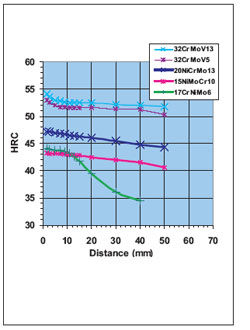
Figure 4a—Hardenability (Jominy test).
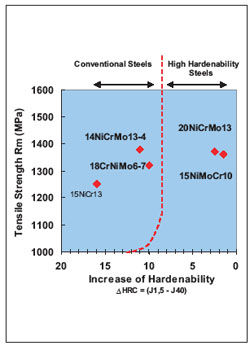
Figure 4b—Classification of carburizing steels.
Materials
In addition to the standard materials for case hardening and nitriding, Tables 1 and 2 show alternatives that give improvements in fracture toughness and ductility. For case hardening these are the materials 20NiCrMo13, 15NiMoCr10 and AISI 9317, and for achieving greater nitrided depths during nitride hardening, the materials are 32CrMoV13 and 32CrMoV5.


These materials all have good hardening characteristics (∆HRC). The flatter the hardness line of the Jominy curve and the smaller the ∆HRC, the greater is the hardenability (Fig 4a).
For case hardening (carburizing) steels with around the same Rm (tensile strength) of 1,300–1,400 MPa, those of low ∆HRC value should be favored, especially for solid parts (Fig. 4b).
To minimize internal stresses, complete through-hardening should be achieved. From the results of the Jominy test, predictions can be made regarding the progression of the hardness curve, i.e. the so-called “U-curve.” (See Figure 4c, based on the example of a round bar of 100 mm.)
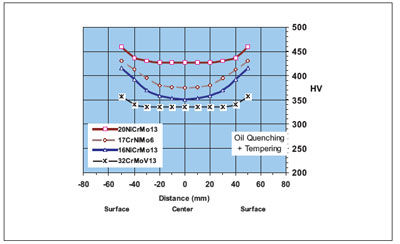
Figure 4c—Hardening intensity curves (100 mm diameter).
Heat Treatment
For high-performance gears, only carburizing or nitriding are considered. The most economic form of heat treatment is undoubtedly case hardening. It allows an almost unlimited range of adjustments to the desired hardness depth and in all standards has the highest values for long-term resistance to pitting and tooth flexure.
The advantages and disadvantages of hardening processes are compared in Table 3.

It can be seen from Table 2 that carburizing shows the highest admissible fatigue strength values, and therefore the components are smaller than with nitride hardening. A disadvantage, however, is the high risk of distortion of the components during quenching, which may result in unknown residual stresses.
Nitriding, on the other hand, is a low-distortion hardening method where the whole heat treatment process is made below the transformation temperature. It is unfavorable, however, that only small hardness penetration depths can be obtained, ranging from 0.5–0.6 mm with normal nitriding steels and up to approximately 1.4 mm with special steels. Moreover, it can be seen from Figure 5 that the hardness progression curve in the nitriding process drops very steeply towards the base material. It is therefore indispensable to determine the position of the maximum transverse strain, which is, according to the Hertzian stress theory, below the tooth surface.
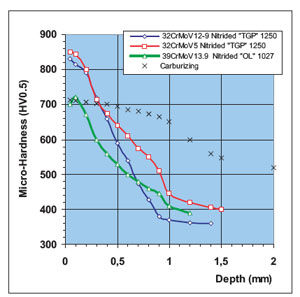
Figure 5—Hardness profile comparison, carburizing vs. nitriding.
In particular with nitriding, but also with carburizing, the transverse strain progression must be checked, and care must be taken that its maximum will be inside the hardened layer.
Figures 6 and 7 show test results of Hertzian stress on a wheel disc and a test gearbox dependent on the ratio of the effective hardness penetration depth to the equivalent radius of curvature in the pitch point. In addition, the calculated limiting curves of ISO 6336-5 and API 613 are shown. These tests and experimental values show that the Hertzian stress is a variable which depends on the gearbox size. Figure 7 shows typical speeds and power ranges for nitrided gears?
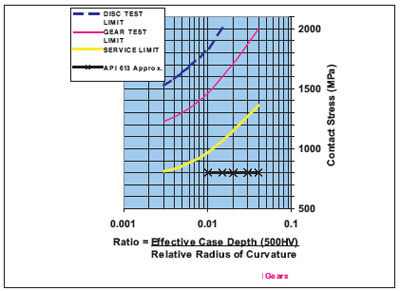
Figure 6—Service experience with nitrided gears, showing allowable Hertzian stress dependent upon case depth relative to shaft size.
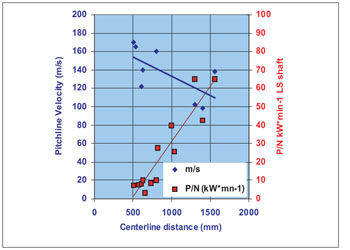
Figure 7—Service experience with nitrided gears, showing speed and power ranges.
Nitrided surfaces are harder and show more brittleness in case of shock strains than carburized ones. Also, the damage curve in the fatigue strength for finite life in nitrided gears is very flat in comparison to carburized ones. This factor influences the rating of gears for starting, shock and short-circuit torques. (See Table 3 for factors ZNT and YNT). The fatigue strength values in regard to quality MQ and ME, however, do not much differ from carburizing. The recalculation of a 75 MW gas turbine gearbox shows that in high-performance gearboxes, the residual stresses have much influence on total strain. Mainly in the case of carburizing, the residual stresses can be different. It is the main advantage of nitriding that the inner residual stresses are very low.
Rating of Shafts
Experience shows that for gear units with wheels of high volume concentration, an inspection for mechanical fracture properties is indispensable, besides the usual strength hypotheses.
Shaft Designs
There are various shaft design concepts, which have influences for the rotor vibration and the quality of the gear. The most used designs are:
• Shrink-fit design.
• Pinion and wheel in one-piece design
Shrink-Fit Design. The shrink-fit design is the most used shaft/hub connection, as the optimal material can be chosen for shaft and wheel. The shaft is transmitting the torque. Therefore a through-hardened steel with the appropriate strength properties will be used.
The usual materials are 42CrMoV4 and for elevated requirements 26NiCrMoV14-5, 30CrNiMo8, or 35NiCrMo16.
The gearing is hardened, i.e. carburized or nitrided steel.
The most used wheel materials (Table 1) for carburizing are 18CrNiMo7-6, 20NiCrMo13 or 15NiMoCr10. The most used materials for nitriding are 31CrMoV9 and 32CrMoV12-9, 32CrMoV5 or 39CrMoV13-9 for extended nitriding depths.
However, the shrink-fit design is limited by the influence of centrifugal forces, and API 613 as well as ISO 13691 do not accept the shrink-fit design for pitch-line velocities over 150 m/sec. In those cases, the one-piece version must be applied. It should be mentioned here that pinions are always made from one piece.
Wheel and Shaft in One Piece. In gear units with transmission powers of 70 MW and more, the one-piece design requires a forging with much weight and much volume concentration, especially in the gearing base area. It is important that such forgings, including pre-turning and ultrasonic testing, are ordered directly from the steel manufacturer.
A specification must be prepared in common, determining all the manufacturing process steps like melting, analysis, ingot size, forging ratio, heat treatment, purity regarding oxides and sulfides, mechanical properties as well as test conditions and acceptance criteria.
Figure 8 shows how the forging should be configured in the gearing area in order to be sure that any flaws or gas bubbles due to blowholes do not exist.
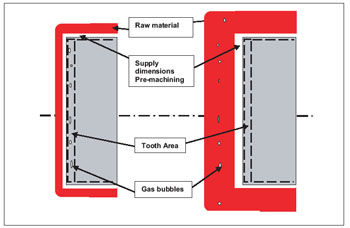
Figure 8—Design of gear forging.
The wheel shaft can be a solid-shaft or hollow-shaft design; due to better hardenability, the hollow-shaft design is preferred. The explanations below show the differences of the two designs with regard to strength behavior.
Solid Shaft. In the solid shaft, stresses are lower, as can be seen from Mohr’s circle. Figure 9 shows the stress comparison between solid and hollow shafts, under centrifugal force, of a 75 MW gas turbine gearbox. Figures 10 and 11 show the progression of the individual stresses. To be added are the residual stresses due to heat treatment and thermal stresses due to temperature gradients in the wheel body.
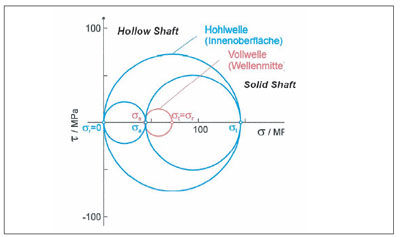
Figure 9—Stress curves according to Mohr for a solid-shaft and a hollow-shaft gearbox.
A disadvantage when using solid shafts is the risk of non-metallic inclusions in the core as well as—in the hardening process—the risk of ferrite contents in the structure of the core area (insufficient core hardening) and thus insufficient strength.
Hollow Shaft. (See also API 613, 5th Edition, 2.5.3.3.) Here the stresses are higher, as can be seen from Mohr’s circle (Fig. 9), but due to the internal bore, the core problems of the solid shaft are eliminated.
Figure 10 shows the progression of the individual stresses, and Figure 12 shows that also with the multiaxial quotient q according to Clausmeyer, the hollow shaft is less favorable than the solid shaft.
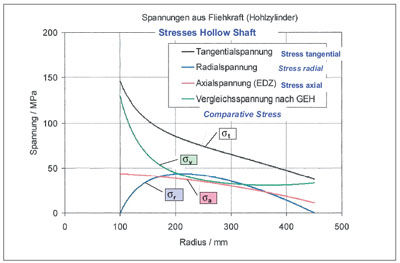
Figure 10—Progression of stresses for a hollow shaft under centrifugal force.
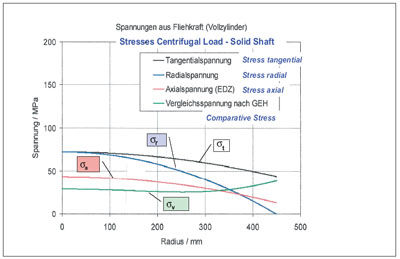
Figure 11—Progression of stresses for a solid shaft under centrifugal force.
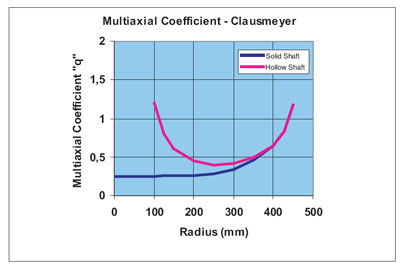
Figure 12—Multiaxial quotient q according to Clausmeyer.
To be added for both shaft designs are the residual stresses after carburizing and thermal stresses due to the temperature gradient in the wheel.
In the solid shaft, these are residual tensile stresses, while in the hollow shaft a shifting to the desired pressure area takes place in the bore surface.
Calculation Methods. In this section, the calculation of a shrink fit is left out and assumed to be known.
In particular, gears are concerned in which gearing and shaft are a unit, which means that both parts are made of the same material and remain always together during heat treatment.
The dimensioning of the shaft is made preferably according to the transverse strain hypothesis for bending and torsion:

where
σv comparative stress (N/mm2)
σx bending stress in x-direction (N/mm2)
τ transverse stress (N/mm2)
σzul yield strength (N/mm2)
The yield strength is applied as admissible stress for failure due to plastic deformation.
Because of possible internal defects in those large forgings, a mechanical fracture assessment must be made.
The following calculation example applies to the bull gear of a gas turbine gearbox with a transmission power of 75 MW and a speed of 3,000 rpm
(generator speed).
Total stress of solid shaft

This total stress must be subjected to a mechanical fracture assessment. In Equation 1, the admissible stress is determined by means of the fracture toughness of the material and a specified maximum defect size, and it is compared with the existing total stress.
 (1)
(1)
where:
KI Stress intensity in the component
KIC Fracture toughness N/mm3/2 (characteristic value of material)
Q Crack shape factor
S Actual safety factor
Smin Minimum required safety factor
a Minor radius of the elliptical failure (defect)
The crack shape factor Q is
determined by:
 (2)
(2)
where:
σ/Rp Efort relation (for conservative assessments, a value of 0.9 is used)
a Minor radius of the elliptical failure (defect)
c Major radius of the elliptical failure (defect)
The Wahre Ersatzfehlergröße (WEFG) represents the diameter of a theoretical circle with the same area as the ellipse of the defect. Translated, WEFG stands for “True Equivalent Defect Size,” and it is derived according to Equation 3:
 (3)
(3)
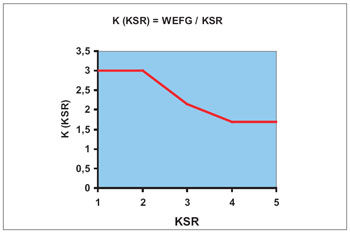
WEFG, i.e., the actual defect size (represented by a circle of equal area) has been determined by the evaluation of many tests, in dependence on the KSR value, by the relation (Fig. 13):
 (4)
(4)

Figure 13—Relationship of actual defect size (WEFG) to KSR (CRR).
For the above-mentioned shaft of 18CrNiMo7-6 and a KSR value of 3 as well as with elliptical defect shape (a/c = 0.4), the Equations 1, 2, 3 and 4 result in the below-mentioned admissible stress values.
For example, a lower value of KIC (for example, 2,000 N/mm3/2) for 18CrNiMo7-6 and a KSR of 3 result in σzul = 556.1 N/mm2. An upper value of KIC (for example, 2,200 N/mm3/2) results in σzul = 611.7 N/mm2.
The value of actual strain is in between, at 578.8 N/mm2. It follows that the material 18CrNiMo7-6 for one-piece gears with much volume concentration is within the limit range.
Summary and Recommendations
When looking at the Jominy curves in Figures 4a, 4b and 4c, it can be seen that—with regard to hardenability—there are still other alternatives to 18CrNiMo7-6 which provide higher mechanical material parameters.
For further increased operational safety, nitride hardening can be considered. It offers the advantage that the whole heat treatment process is made below the transformation line, which means no risk of distortion and no risk of high residual stress.
To sum up, one can say that the mastery of such gears requires the following conditions:
• Material with fracture toughness K1C ≥ 80 Mpa1/2.
• Yield strength Re > 750 MPa.
• Sufficient ductility.
• Structure hardenable to the core.
• Proof of sufficient potential hardness increase adapted to U curve (Intensity of potential hardness increase).
• Low distortion during hardening process.
• Reduction of residual stresses by subsequent machining, e.g., excavation.
• Selection of a low-distortion hardening method such as gas nitriding.
• Use of special steels for increased hardness penetration depth when nitriding.
• Requirement: Steel production and forging of the ingot to be in the same factory.
• Material Quality: MQ or better ME.
• Melting: Vacuum degassed or remelting according to ESU.
• Cleanliness: Pmax 0.007, Smax 0.007, K4 = 20 (Oxide + Sulfide).
• Forging ratio: ≥3.5.
• Grain size: Fine grain, predominantly 5 and finer.
• Heat treatment: Hardening and Tempering.
• Non-destructive testing (see Fig. 14)*: Rough machined and finished, followed by ultra- sonic inspection test to enhanced SEP 1923 or ÖNORM 3002–class 2–group B7 surface crack test.
• Test mechanical properties :
o Optimizing notch value and dilation.
o Optimizing Jominy-Curve for high alloy steel—restricted hardenability band (H).
o ∆HRC = HRC1.5 – HRC40 < 2–3 max.
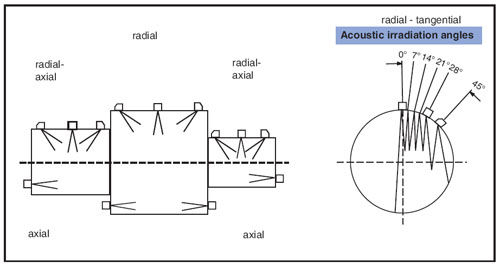
Fig. 14 shows that the check of the shaft core for inclusions and cracks can be detected only by using special sensors for different sound-angles. An ultrasonic inspection test of radial and axial angles with 0° is not sufficient.
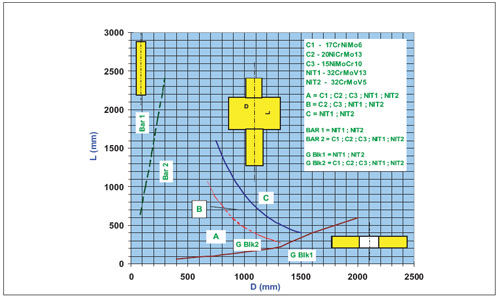
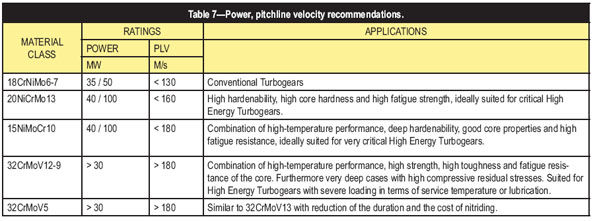
From these requirements, the authors give some advice for the material selection as well as for the hardening method, shown in Figure 15 and Tables 4–7. Such advice only represents ideas for the design of high-energy gear boxes which are based on many years of experience.

Figure 14—Ultrasonic inspection of integrally forged gear element.

Figure 15—Heat treating recommendations for blank, pinion, gear and integrally forged gear elements.


Standards:
AGMA 421-06, AGMA Standard Practice for High Speed Helical & Herringbone Gear Units, January, 1969.
AGMA 2101, Fundamental Rating Factors and Calculation Methods for Involute Spur and Helical Gear Teeth.
AGMA 6011, Specification for High Speed Helical Gear Units.
API 613, Special Purpose Gear Units for Petroleum, Chemical and Gas Industry Service, Fifth Edition, June 2003.
ISO 13691, Petroleum and natural gas Industries—High-speed special purpose gear units, First Edition, 2001-12-15.
ISO/TR 13989–1, Calculation of scuffing load capacity of cylindrical, bevel and hypoid gears, Part 1: Flash temperature method.
ISO/TR 13989–2, Calculation of scuffing load capacity of cylindrical, bevel and hypoid gears, Part 2: Integral temperature method.
ISO 6336–5, Calculation of load capacity of spur and helical gears, Part 5: Strength and quality of materials.
ISO 1328–1, Cylindrical gears—ISO systems of accuracy—Part 1: Definitions and allowable values of deviations relevant to corresponding flanks of gear teeth, 1995.
SEP 1923, Ultrasonic testing of forgings for higher requirements, in particular for turbines and generators.
ÖNORM 3002, Ultrasonic testing of steel forgings—Performance inspection coverage, quality level.
References
1. Welch, W.P. and J.F. Boron. “Thermal Instability in High Speed Gearing,” Journal of Engineering for Power, January 1961, pp. 91–107.
2. FVA-Programs Research—Reports and Calculation—Programs of the German Gear Manufactures within the FVA (Research Association Gear Technology), available only for members of the FVA.
3. Tables for Material and Selection Lists, Support by Aubert & Duval, Buderus.
4. Fracture Mechanics: Murakami, Stress Intensity Factors Handbook (Vol. 1 and 2), Pergamon Press 1987 and Newman, J.C., “Stress Intensity Factor Equations for Cracks in Three Dimensional Finite Bodies,” NASA Technical Memorandum 83200, August 1981.
5. Young, I. T. A Wider Scope for Nitrided Gears, ASME 80-C2/DET-46.
6. Girordin, D. and J.Y. Moraux. “L’acier 32CrMoV13 nitruré profond pour applications aéronautiques,” ATTT/AWT - Journées franco-allemande, Aachen, 2002.
7. Joly, P., J. Frey, B. Lafleur, J. Dulcy and M. Gantois. “New developpements, in nitriding steels and associated nitriding process control, for very deep nitrided cases,” ATTT/AWT - Journées franco-allemande, Aachen, 2002.
8. Jacques, C., D. Nélias, G. Normand, A. Vincent and G. Dudragne. “Rolling Contact Fatigue of Nitrided 32CrMoV13 Steel,” Congrès Leeds-Lyon, June 2002.
9. Girodin, D. and G. Dudragne. “Bearings Steels for Aerosapce Applications,” 3rd Symposium Ascometal, Arles, June 2000.
10. Albertin, L., R.L. Frolich, H. Winter, B.-R. Höhn and K. Michaelis. “Load Carrying Capacity of Nitrided Gears,” AGMA Technical Paper 94FTM4.
11. Joly, P., J. Frey and A. Verge. “Solutions métallurgiques pour réduire les déformations de trempe de pièces cémentées,” Congrès ATTT/AWT, Strasbourg, March 2003.
12. Joly, P., J. Frey and J.Y. Moraux. “Aciers de l’aéronautique et du spatial. Influence de l’évolution des procédés de traitements thermiques et thermochimiques sur le développemnt de nouvelles nuances,” Congrès ATTT/AWT, Strasbourg, March 2003. Traitement Thermique [ 350 ] October 2003.
13. Joly, P. “A Carburizing steel with improved properties for highly stressed gears, a higher temperature carburizing steel,” private communication, authorized by the author.
14. Joly, P. and Daniel Girodin. “Deep Nitriding of the 32CrMoV13 Steel (AMS 6481 0.32 % C - 3 % Cr - 1 % Mo - 0.2 % V) and its Application for Aerospace Bearings,” Toronto, May 2005. Private communication, authorized by the authors.
Erwin Dehner is the former managing director of BHS Cincinnati, where he was employed for more than 30 years. He also spent 30 years as a member of the advisory group of the FVA (union for research and gear development within the VDMA). He served as convenor of the ISO working group WG11 “High-Speed Enclosed Gear Drives” from 1993–2001. That group’s work resulted in the ISO standard 13691. Dehner also served from 1995–2001 as a discussion leader at the Turbomachinery symposium held each year in Houston. He has written for numerous publications about ships, turbogears and bearings, mainly in German. Although retired since 2001, he has since then served as a consultant and as an instructor in a seminar for epicyclic gears at the Technische Akadamie Esslingen.
François Weber is a former member of the board of management of Flender-Graffenstaden, where he worked for 40 years. Prior to serving on the board, he was managing director for sales and design. He has served for 20 years as a member in the advisory group “Gear Development” of UNITRAM (the Association of French Manufacturers of Mechanical Power Transmissions), and he has also served on committees and working groups of national and international standards bodies. He has written for numerous publications about design, material selection and best practices for turbo-load gears and steam turbines. Since retiring in 1999, he has worked as a consultant on turbogear problems.




 (1)
(1)
 (2)
(2)
 (3)
(3)
 (4)
(4)
