When it comes to large gears, the parts have already passed through a long value chain in their creation by the time they come to the grinding procedure. They have generally been hobbed or milled; hardened; face and bore ground; and the very last process may be the profile grinding, which means a scratch or error on your part at this stage is detrimental. In a smaller automotive gear application, there might be some sacrificial flexibility, but not with large gears. It must be correct right out of the gate.
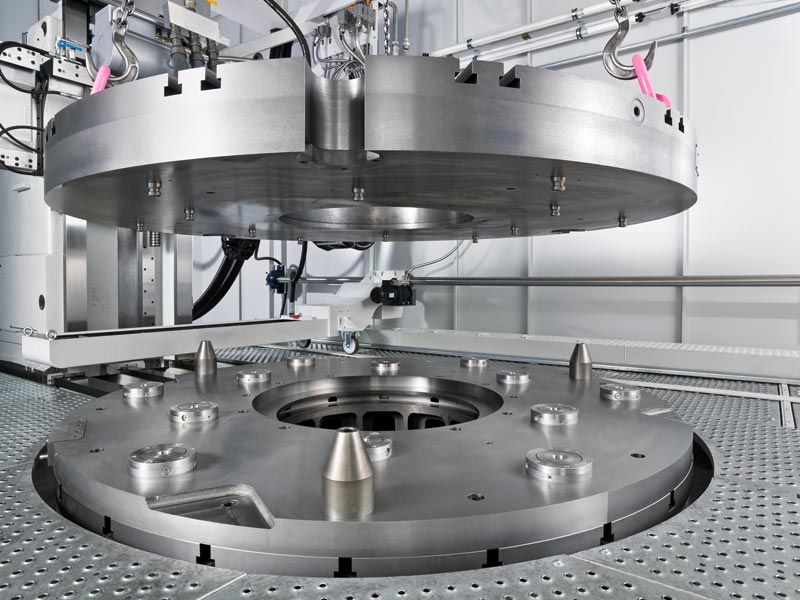
Getting things right begins with loading and centering the workpiece on the machine table, and conventionally, this time-consuming manual alignment requires a lot of time and effort to hammer large gears into place because they can weigh tons. A crucial aspect of reducing nonproductive idle time is the ability to load a part quickly and accurately. Workpiece changeover time is now reduced up to 70% compared to manual clamping thanks to the innovation of zero-point clamping systems for automated loading. This modular system for centering and clamping automatically pre-adjusts parts on a separate setup table to reduce idle time. It’s not as rapid as it would be for a small parts changer on something which would be seconds, but this does reduce idle time in changeover significantly to 5 to 10 minutes.

Figure 6 Zero-point clamping is crucial to reducing nonproductive time when loading and centering large gears.
Manufacturability is essential. Prior to software like Gleason’s KISSsoft, there were gear designers and the people who made them — two different worlds — one trying to imagine in theory the stress peaks, writing it down into a gear drawing, and the other in production struggling to make them as they were designed in theory. This was a very expensive and time-consuming trial-and-error process, and given the relative difficulty of loading large gears, that could lead to a very protracted cycle time. So, KISSsoft and technology like it bring the abstraction of design to physical reality in terms of what’s possible within manufacturing parameters.
Twist influence is a KISSsoft parameter that evaluates contact patterns of gear mesh and makes micron-level adjustments to influence the stress distribution called the normal force curve. Quality demands for surface roughness — which affects NVH, durability, and service life — in the wind market are very high, which requires tightening tolerances through complex geometrical modifications onto the basic shape of the involute gear geometry itself. That ensures the gear is twist free with good surface roughness (Rz ~ 1 µm). These modifications could include additional crowning or an end relief at the tip or the root of the profile to avoid partial overload in the stress distribution. The importance of integrated design software and production can’t be overstated in achieving manufacturability.
Quality demands are extremely high in the wind market — not just for the required efficiency of power transmission but also because premature wear or even failure of gear drives will result in high maintenance and repair costs, especially with large turbines installed offshores. The need for the best surface qualities is one of the reasons why Gleason’s Titan series was developed with a tool changer — to switch to a grinding wheel with different specifications required for extremely good surface finishes. A tool changer in other kinds of machining processes is not uncommon, but for gear grinding, the Titan machines remain unique in the industry and, by eliminating extra setups, it reduces a lot of nonproductive time.
Grinding Smarter, not Faster
Typically a machine is set up with a grinding wheel of a particular grit size, and while the dressing parameters can be adjusted to achieve different finishes from the same grinding wheel — say one for roughing and another for finishing — the finish will only be as good as its actual grit size, meaning it will not be up to the level of superfinishing allowed by switching over to a separate tool with a finer grit size. Hence, when there is only one tool to work with, the grit size is always prone to compromise with its dual task of material removal in the roughing strokes and surface finishing in the final strokes.
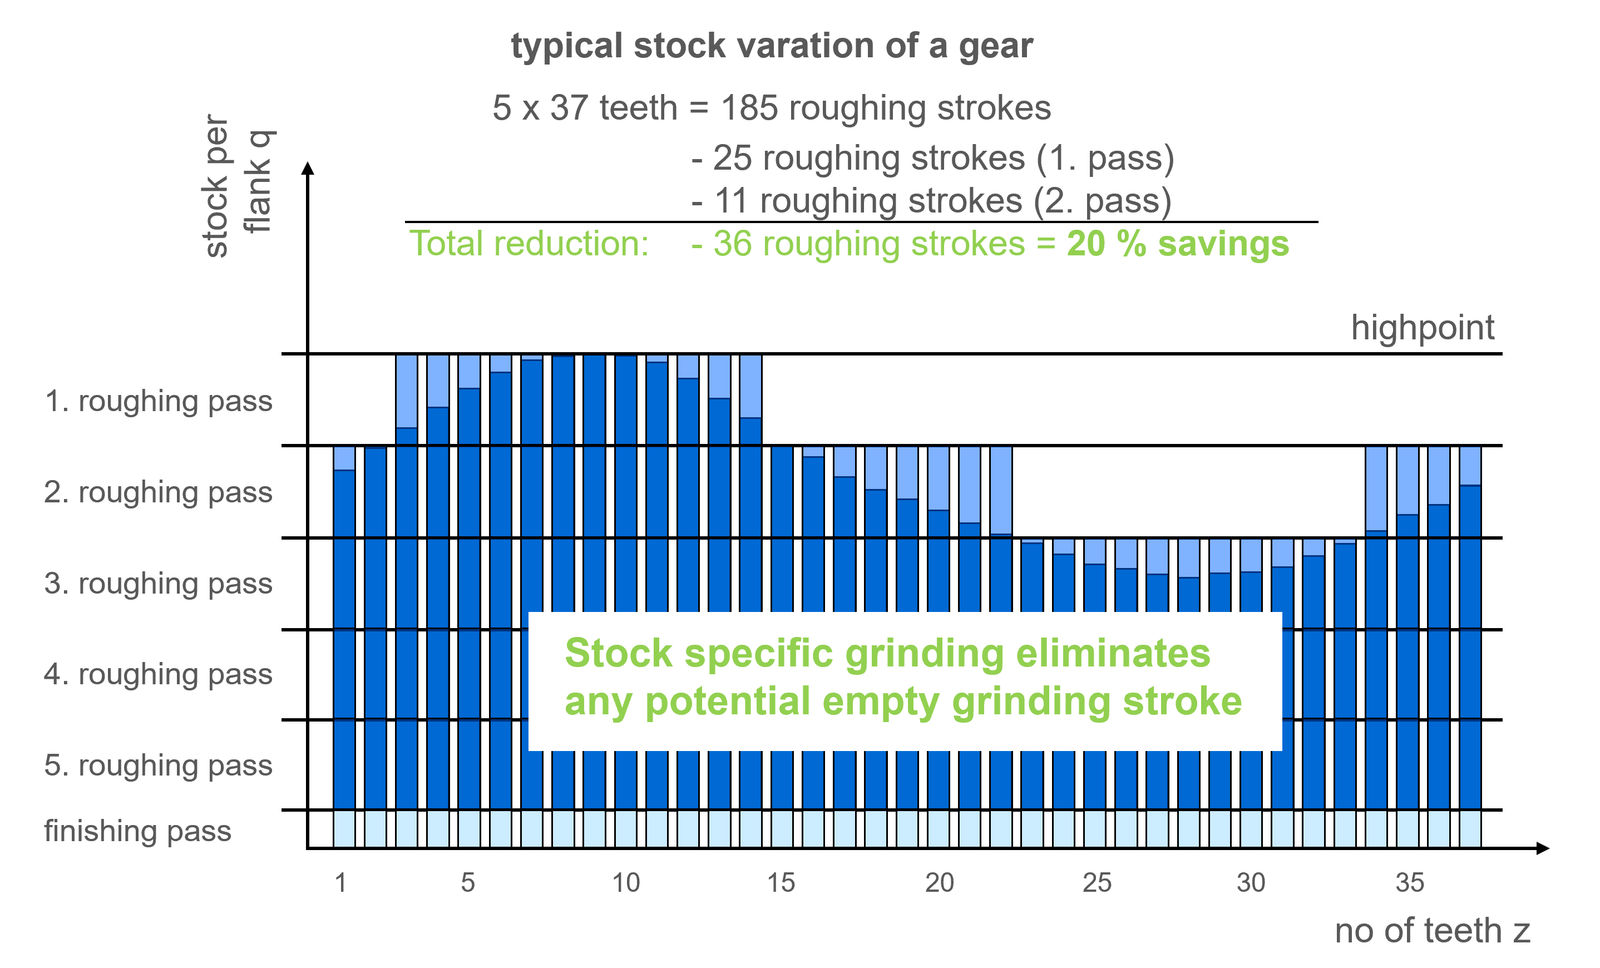
 Figure 7 Stock-specific grinding eliminates the potential for empty grinding strokes.
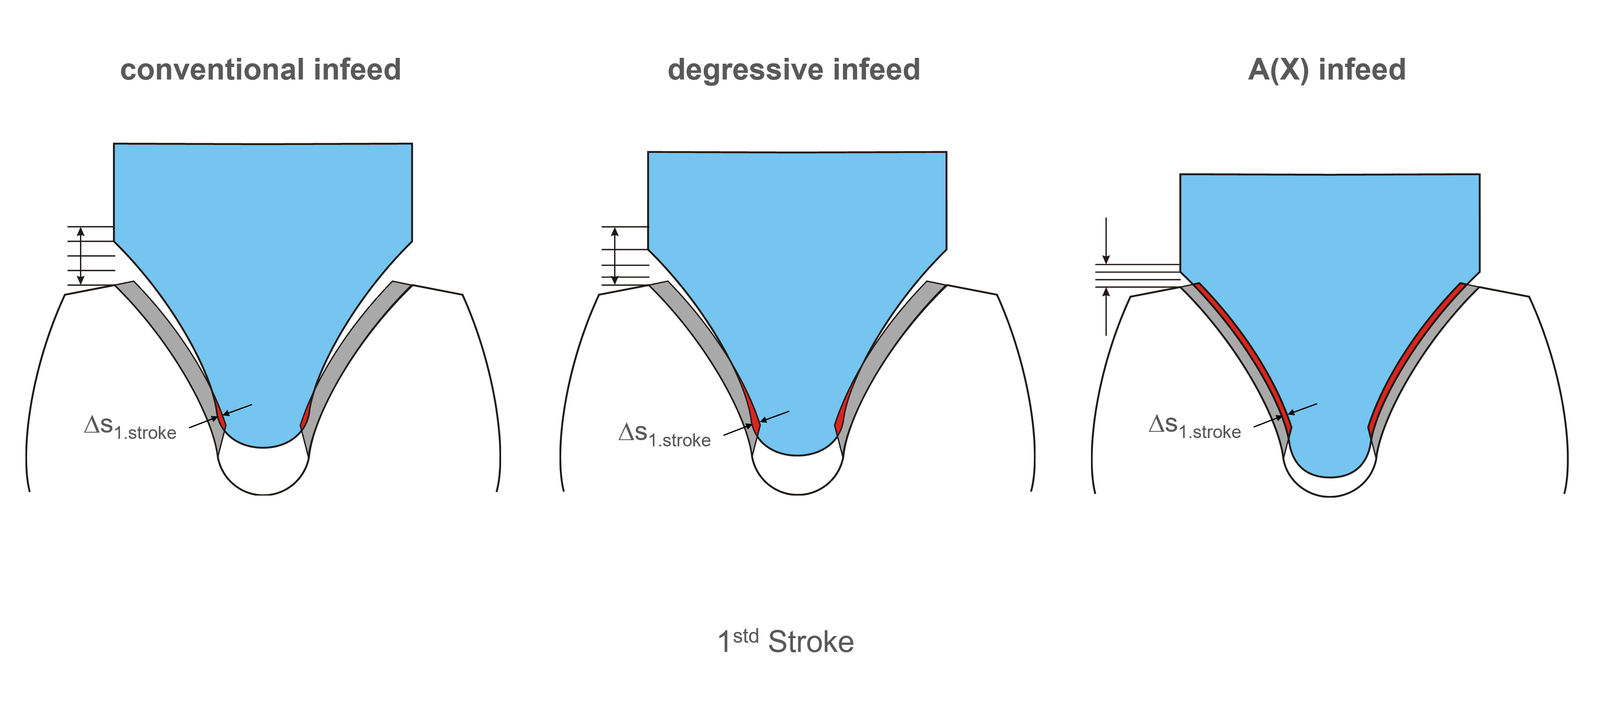
 Figure 8 Infeed strategies with distributed material removal per stroke improves productivity and process reliability.
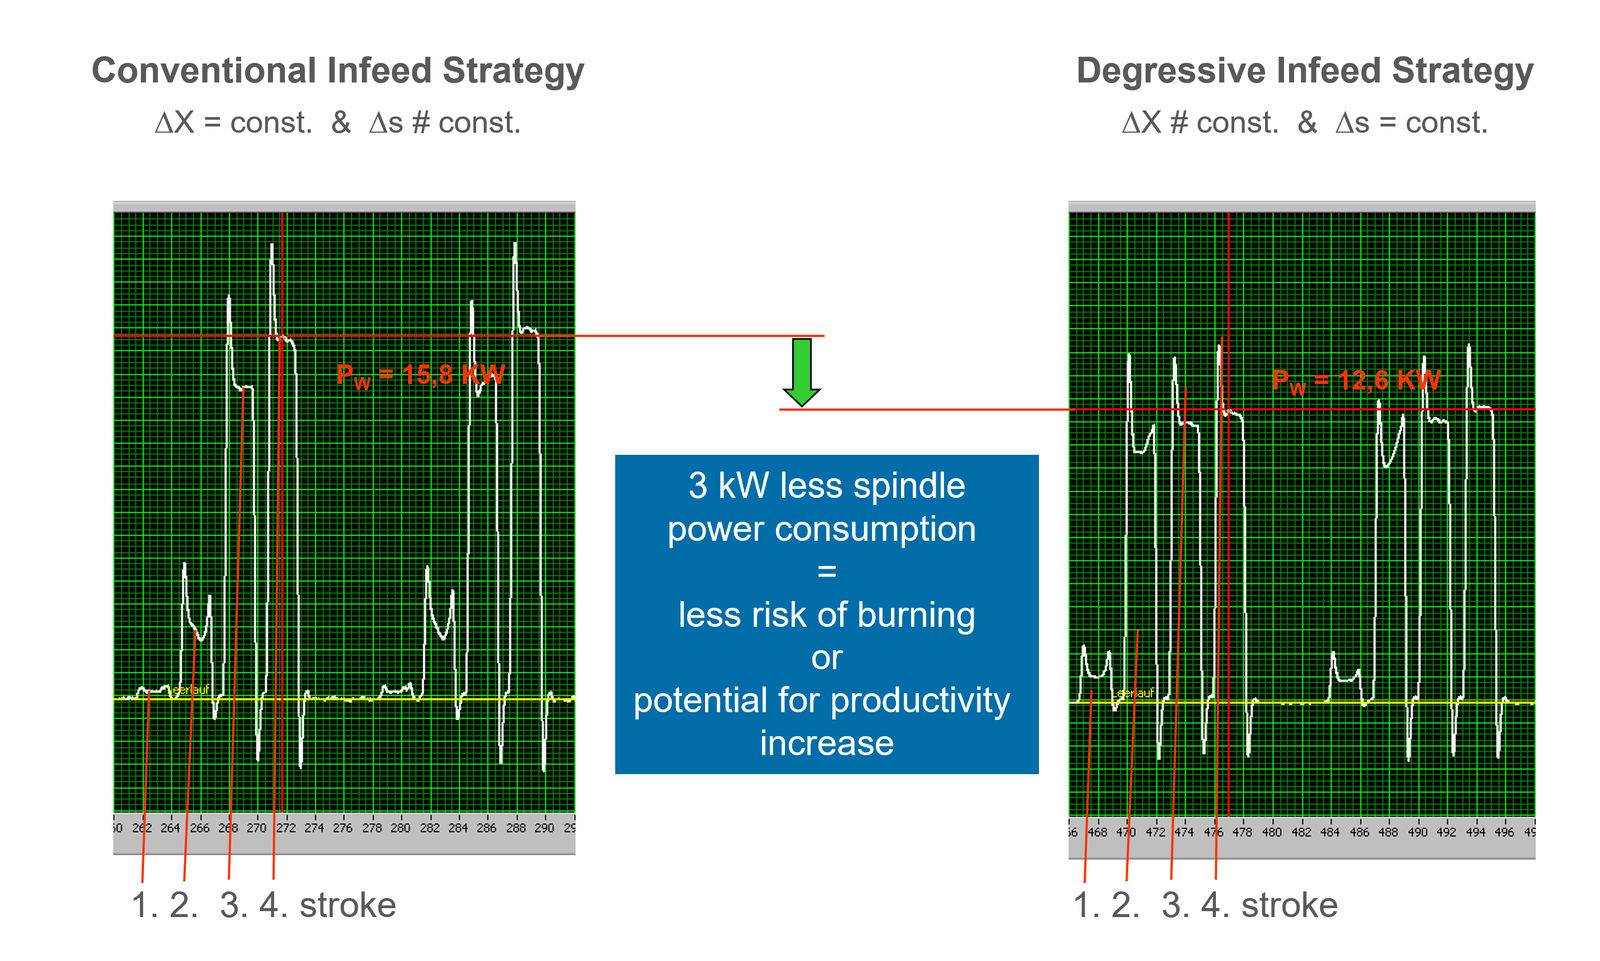
 Figure 9 Graph demonstrates the spindle power comparison between infeed strategies.
The temptation in grinding is to speed up the production time by adjusting the speeds and feeds of the machines, but this will invariably affect part quality and tool life, which will ultimately lead back to waste of both time, money, and other resources in the form of bad gears, energy, and undue machine wear. Stock-specific grinding eliminates any potential empty grinding strokes by using a touch probe to evaluate the orientation of the gear in relation to the grinding wheel in the event of distortion from heat treatment. The algorithm determines the high and low points from a representative sample of measurements. It averages them based on the typical ovaloid distortion of a large gear being hung in an oven for hardening. The machine will only rough pass those high teeth profiles skipping teeth that are already within range until in subsequent passes more teeth are ground until all have been brought to their finished pass dimension.
The main task of dressing is to generate the correct wheel geometry, sharpen the wheel topography, and establish a minimum runout of the wheel. The three primary dressing methods are base dressing to create a new wheel geometry, rough dressing for material removal, and finish dressing for quality surface finish and precision. The wheel can be dressed to have a more aggressive microgeometry for roughing strokes, and a finer one for finishing strokes. Smart dressing utilizes the base strokes to establish geometry by utilizing more of the dressing wheel tool surface area than just one edge, which can be preserved for dressing the grinding wheel for roughing and finishing.
With a conventional infeed strategy, a gradual amount of stock per flank is ground and hence the real material removal is increasing from stroke to stroke, but that means most of the material is removed in the last roughing stroke, which creates a high risk for thermal damage in the last stroke and greater power consumption on the grinding spindle. An infeed strategy with a distributed material removal per stroke improves productivity and process reliability. Degressive infeed means taking a more aggressive first stroke and then less with subsequent strokes hence degressive, and an A(x) infeed strategy means a slight tilt on the A-axis for the x-axis infeed ensures contact with the whole tooth profile, which means less infeed required hence fewer strokes and increasing productivity.
gleason.com
True Grit
Norton’s straightforward approach to grinding wheel formulation is to understand what the customer is looking for, identify their pain points, and then apply three of their different technologies (TQ, Quantum Prime, or TQX), which are like ingredients because, depending on what type of metal is being ground, it’s important to select the right percentage of an appropriate secondary abrasive that’s both chemically the best fit for that material and cost-effective. Grinding wheels are not purchased stock, they are predominantly made to order. However, there are blank wheels of certain common compositions that are kept in an unfinished state, which allows for a quick turnaround.

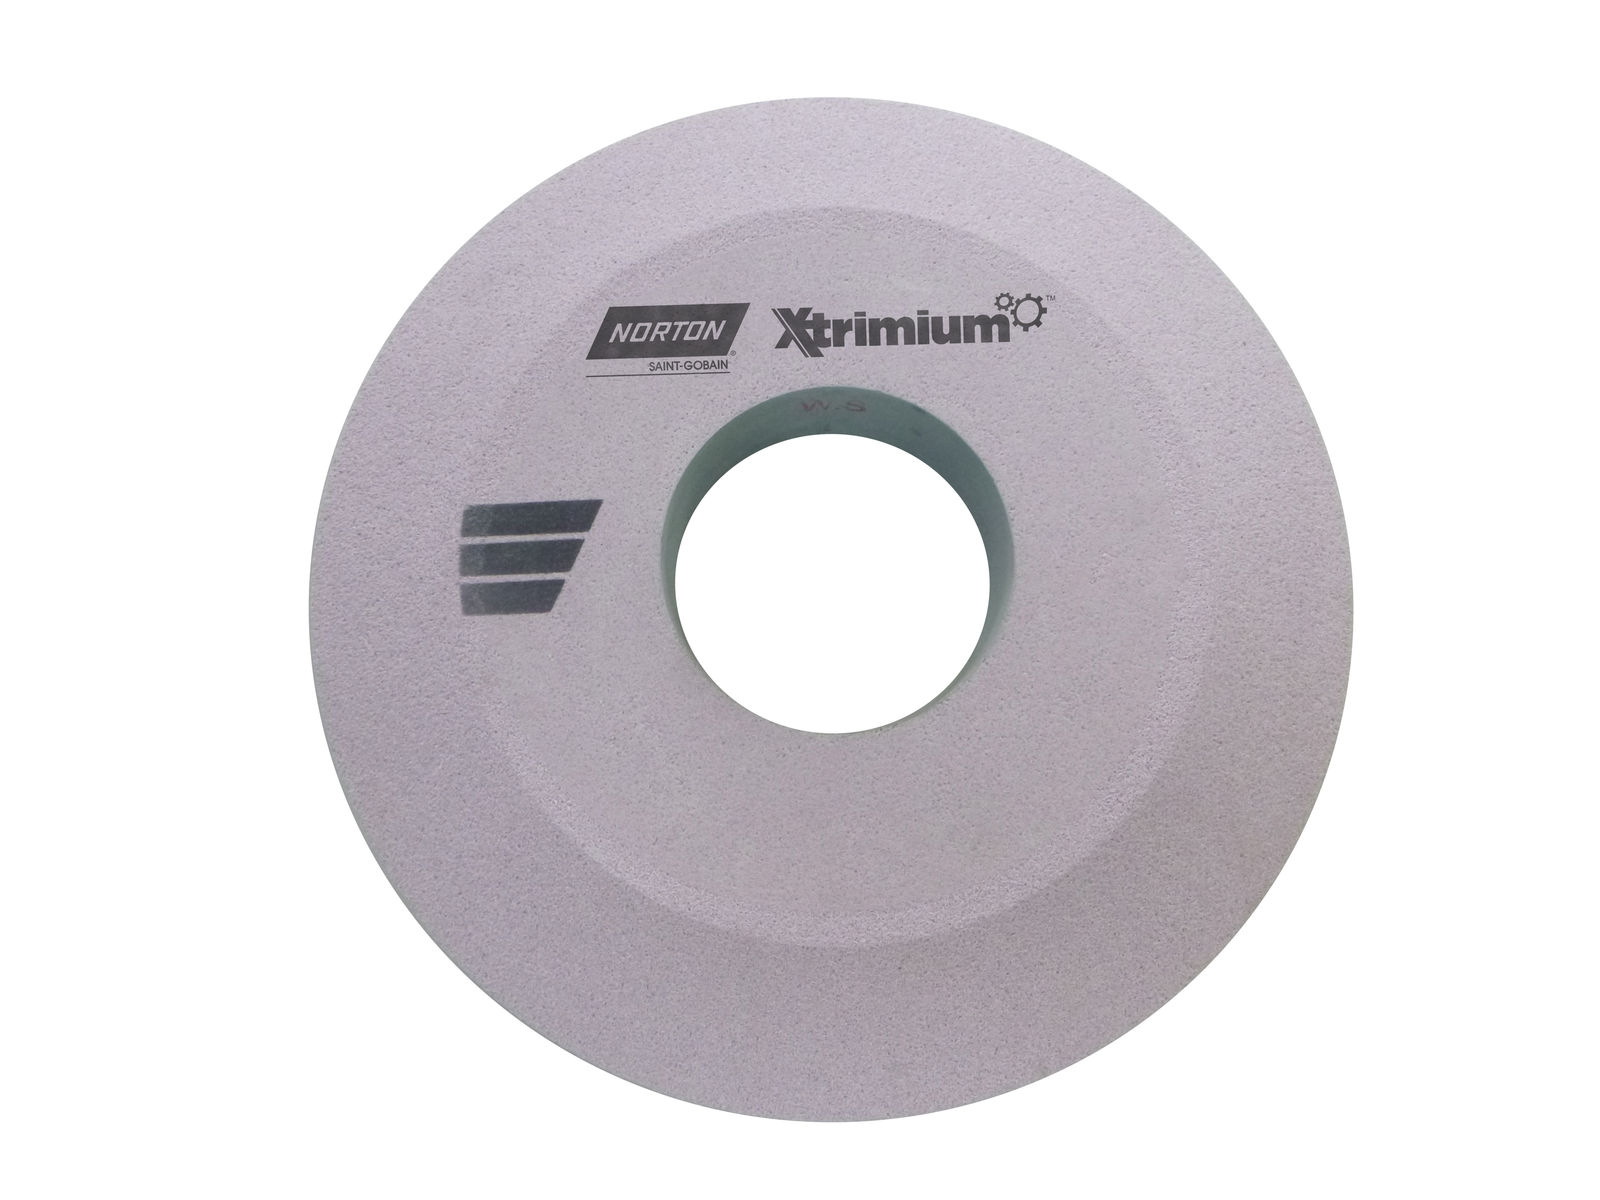
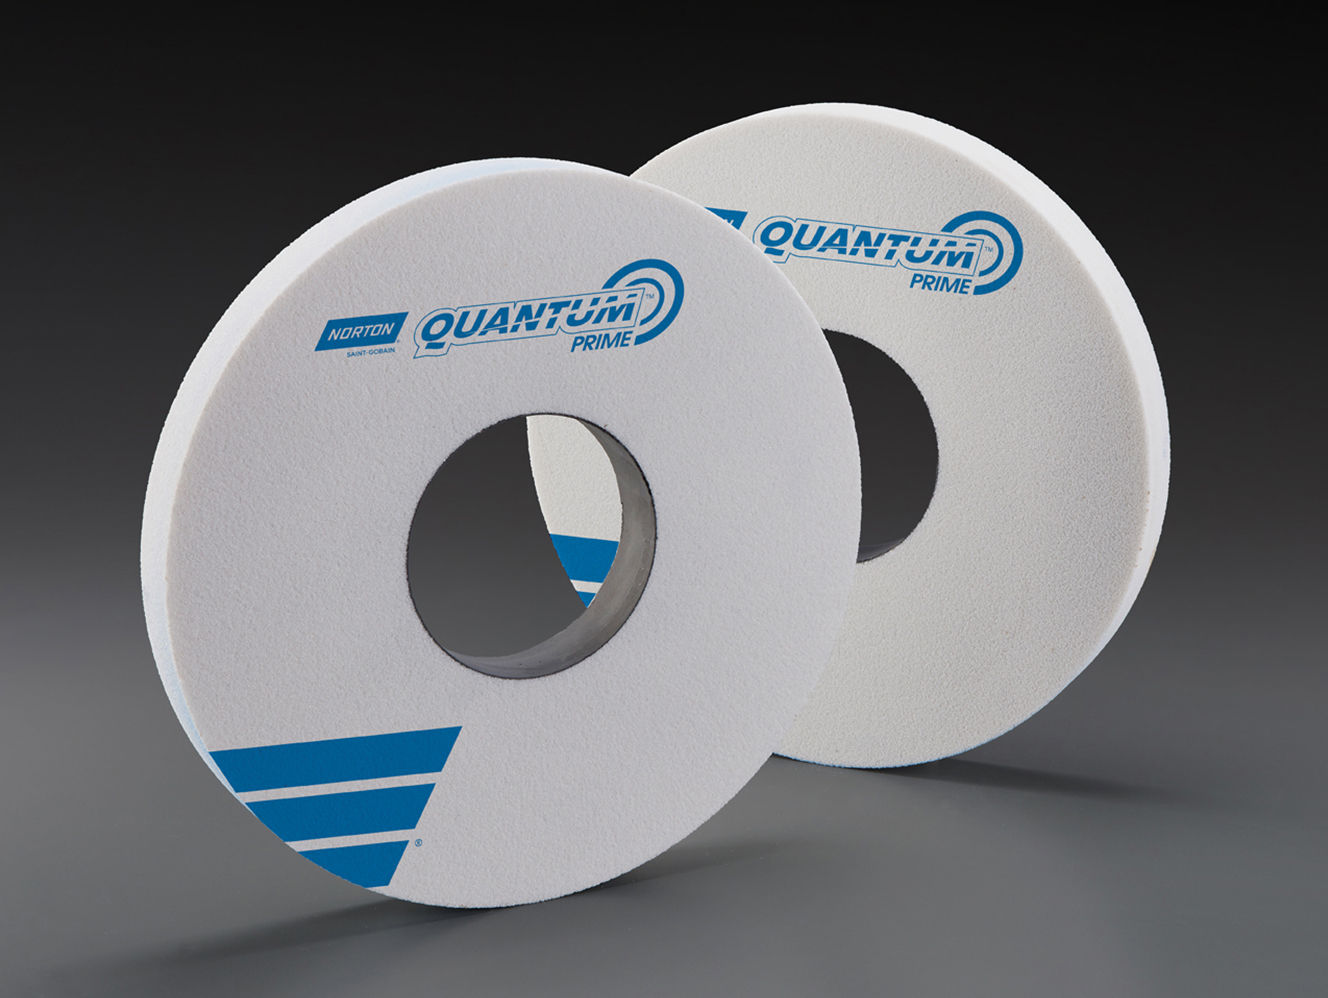
Figure 10 Norton Xtrimium is an example of a profile grinding wheel that uses TQ and TQX technologies.
TQ, Norton’s go-to profile gear technology, is a shape-engineered aluminum-oxide grain that economically offers speed and quality, which is the best of both worlds. To meet the highest quality demands, Quantum Prime is used because it provides the smallest tooth-to-tooth variability in flank and profile at very low power levels. This is possible due to the combination of three critical technologies: Quantum Prime, Vortex2, and Vitrium3. Quantum Prime is a brand-new ceramic grain technology designed for high productivity and quality with low power draw, meaning a lower risk of grinding burn. Vortex2 utilizes agglomerated aluminum oxide to create an engineered porosity that maximizes coolant in the grind zone and improve formholding due to improved homogeneity of the porosity. Vitrium3 is a strong bond that allows the abrasive grains to be used to their fullest before introducing new sharp grains. Quantum Prime works well at a high speed but not as much as a shaped abrasive like TQX, which is built for speed. With its long shaped-grain abrasive, TQX allows very high removal rates while keeping cool. A high-quality surface finish is sacrificed at those speeds, but for certain applications that’s acceptable.

Figure 11 Norton Quantum Prime is a new ceramic grain technology designed for high productivity and quality with low power draw.
Quality is the number one priority which means not introducing heat into the part while maintaining superior formholding and surface finish. And secondly, finding opportunities to control cost — by factoring for parts per dress, wheel life, dress depth, and cycle time — are all considered and optimized to save the most money for the customer.
The Secret Ingredient
It may seem counterintuitive, but the secret ingredient is nothing — in a grinding wheel, empty space is as important as the physical ingredients. The more consistent the size and spacing of the pores, the better the wheel will perform. Problems of variation will cause different parts of the wheel to break down at a faster or slower rate than others. You do want the wheel to break down — that means it is resharpening itself — but you want it to break down very consistently. Consistency ensures there is no heat buildup or excessive breakdown. These are concepts that are basic to grinding but considering the precision requirements for gears, they need to be harmonized.

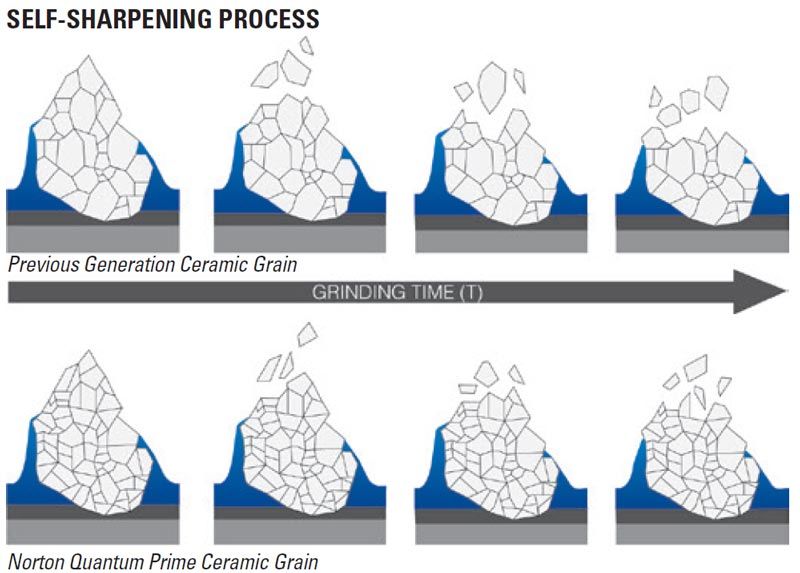
Figure 12 Ceramic grain is designed to break down smaller so it will last longer, but Norton Quantum Prime is drastically smaller than the typical ceramic grain. Illustration courtesy of Norton Saint-Gobain Abrasives.
Grinding wheel design has several priorities and grinding without burn is number one and formholding second. Speed affects both. The goal is to get a surface finish that minimizes the amount of variation as you grind. The chemistry of holding the abrasive grain in the bond matrix for a precise amount of time is referred to as “grain adhesion science.” Bond posts — the optimal amount of bond needed to hold the grain in place without burning and to maintain the form — hold the grain in place and then the grain itself does the grinding while promoting a more controlled breakdown of the abrasive. That leads to less variation in the profile and flank and consistency in surface finish. Quantum Prime breaks down into extremely small pieces. Ceramic grain is designed to break down smaller so it will last longer, but Quantum Prime’s crystal size is drastically smaller than the typical ceramic grain. With gears specifically, the finish it achieves addresses the issues of NVH very well because it is so controlled and consistent along with a low risk of burning.

Figure 13 For large gears, the diameter of a grinding wheel is sized to reach the full depth of the gear tooth but also last long enough to avoid a mid-operation wheel change. Image Courtesy of Norton | Saint-Gobain Abrasives.
Dress to Impress
Once you move away from conventional abrasives with very low or no ceramic grain, you can use normal lower-tier diamond rolls called infiltrated diamond rolls which use a certain type of metal bond to secure the diamond. But once you get into the ceramic-grain grinding wheels used for greater material removal on large gears, Norton recommends a chemical vapor deposition (CVD) reinforced diamond roll for dressing, which is larger and very precisely sized and shaped for those applications. Because the chemical nature of the CVD is tougher, it will last longer when dressing the ceramic-grain grinding wheels. That’s recommended particularly on larger wheels where you have a 6 or 8 in. diamond roll but you have a 12 or 14 in. grinding wheel.
Profile gear wheels typically range from 100–450 mm in diameter. Sizing is driven by the parameters of the machines which have a minimum and maximum OD they accept. For large gears, the minimum might be 300 mm because you want to be able to dress the double bevel into the wheel itself but also reach the full depth of the gear tooth. But you also want the wheel to be large enough to last an appropriate amount of time because tool changing is time-consuming, so ideally that same wheel will complete the entire gear or multiple workpieces.
One thing is clear from speaking with Gleason and Norton: toolmakers don’t sell tools, they sell process solutions to technical problems. That is an essential point of view to take into consideration when quality and precision are paramount. These relationships often begin with a part drawing and then a process to support the creation of that part is developed according to appropriate time and quality standards. Tools are not bought in isolation but as part of a whole. A process acceptance involves a proving demonstration. So it’s not like buying a suit off the rack, it is like having a team of tailors make one bespoke to your exact measurements just as you need a process that suits your needs.
nortonabrasives.com
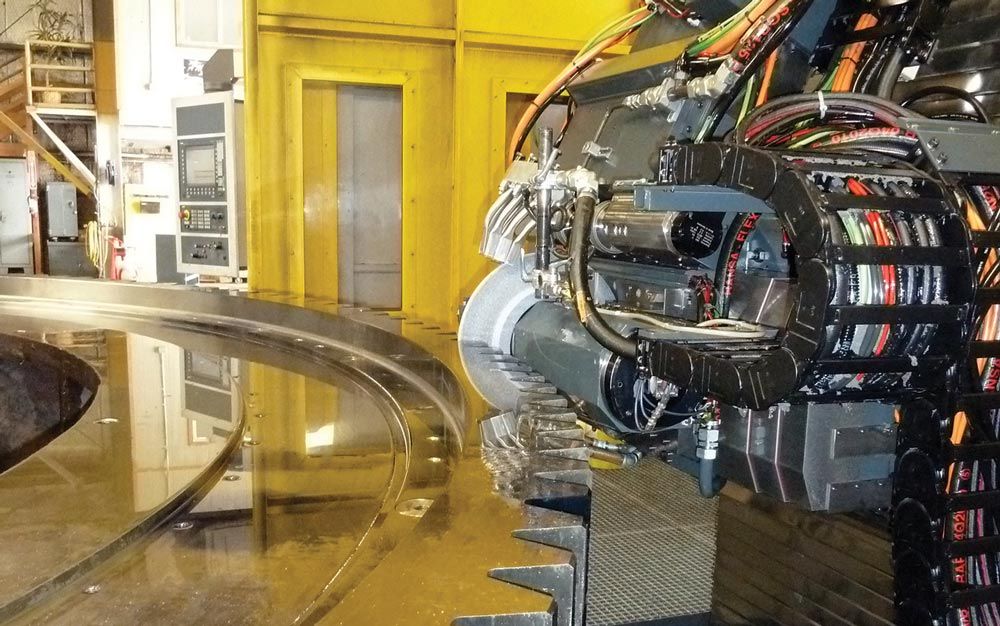
 Figure 1 Gleason P6650G.
 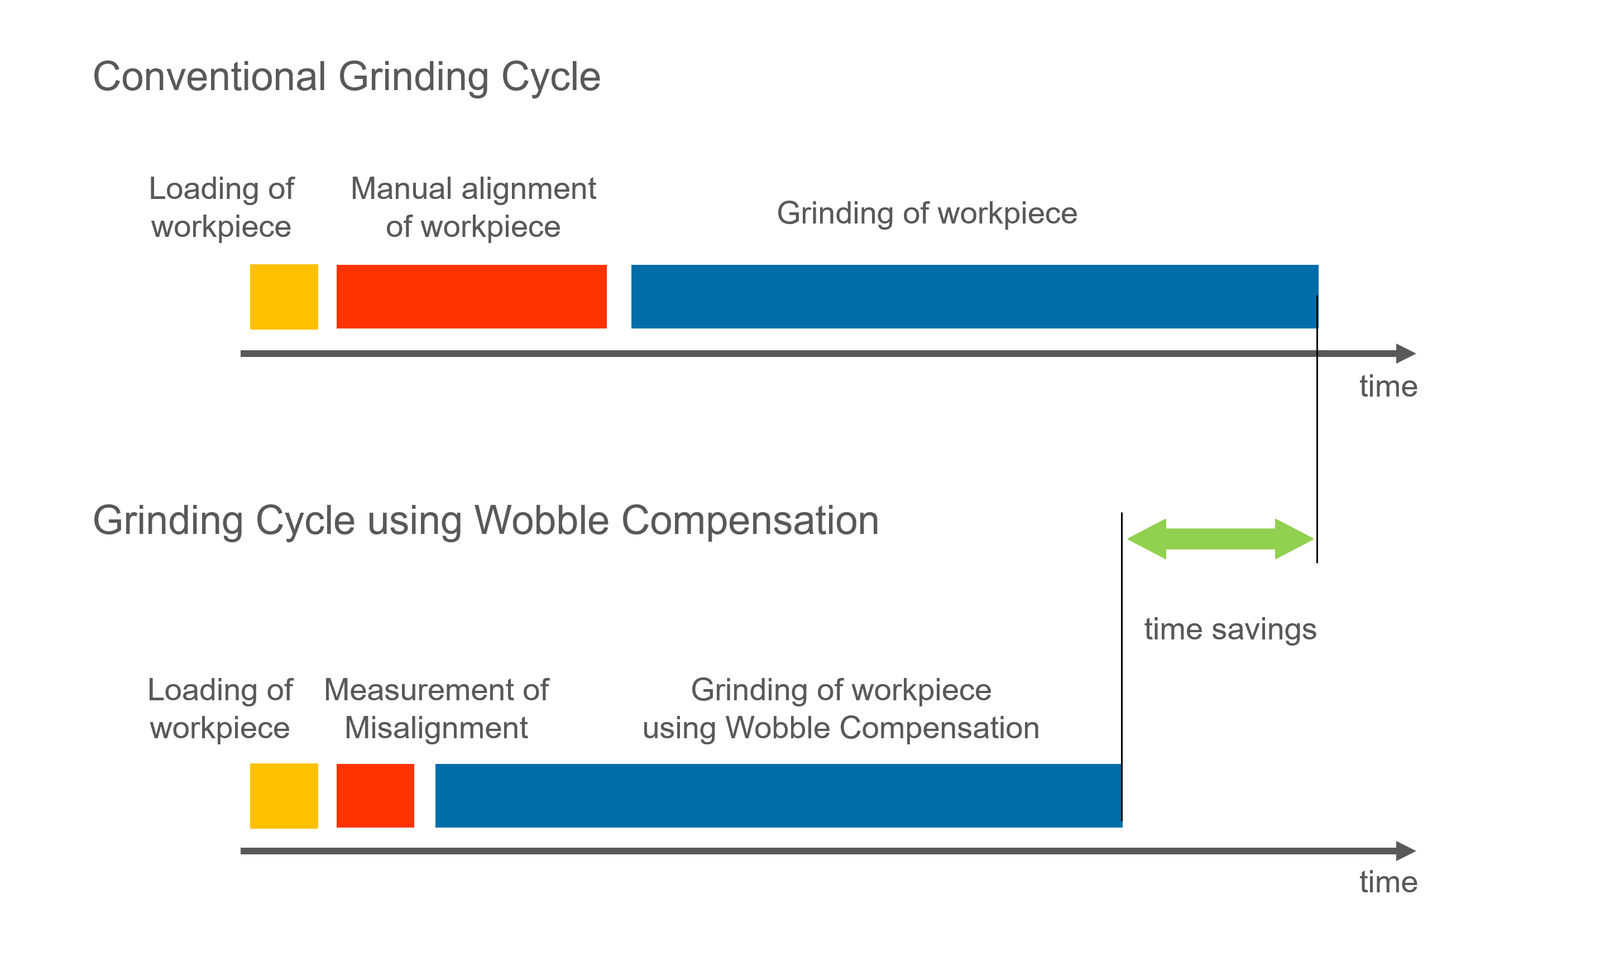 Figure 2 After measuring misalignment, a wobble compensation feature reduces nonproductive time.
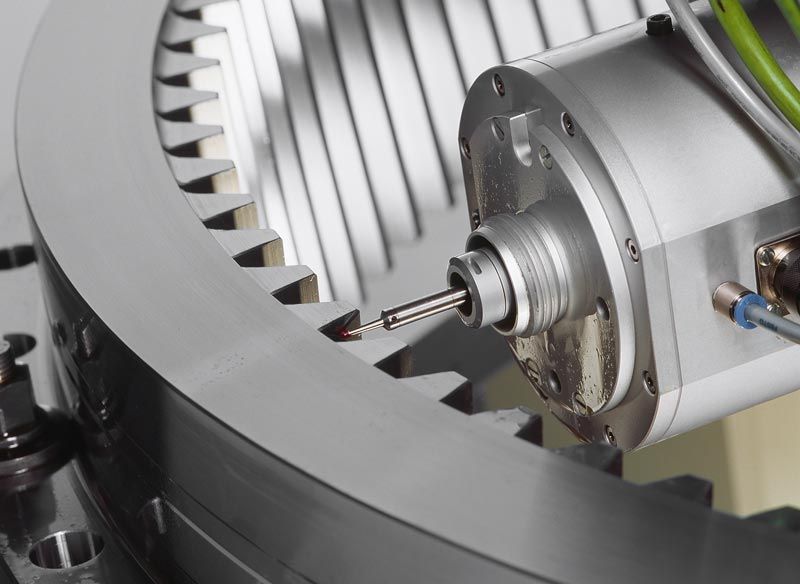 Figure 3 On-board inspection of both internal and external gears is fully integrated on Gleason machines.


