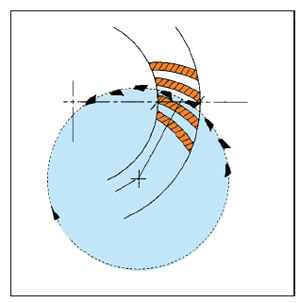
In face milling, one slot is cut at a time, and the cutter must withdraw and then index to the next slot. Face-milled gears can be lapped, skived or ground.
Hard Finishing of Cut Gears
The differences in geometry from the design and method of production play an important role in how the gears may be finished. As mentioned above, face-milled gears can be lapped, skived, or ground. Face-hobbed gears should only be lapped or skived for the finishing operation.
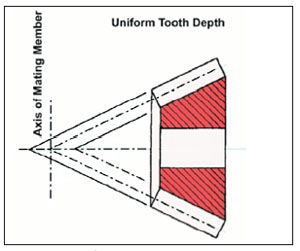
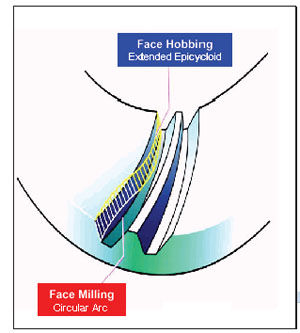
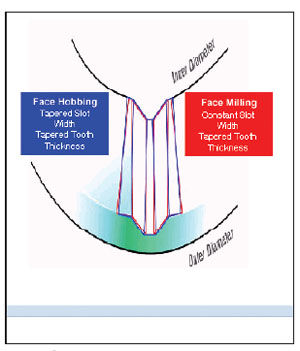
Although it is possible to grind a gear cut by face hobbing, it is not recommended. The reason can be seen in Figures 7 and 8. The face-hobbed gear will have an epicycloidal shape along the face width. The grinding operation would remove the epicycloidal shape and leave a circular arc. This would result in a gear with an uneven case depth after the grinding process. In some cases, it may turn out that all or most of the case depth would be removed in some areas of the tooth and not even touch (clean up) the tooth surface in other areas. A similar problem with uneven case depth will exist because of the differences in tooth depth between face-hobbed gears (parallel depth) and face-milled gears (taper depth).

Figure 7—Face hobbed gears have an epicycloidal shape along the face width while face milled gears have a circular arc along the face.

Figure 8—Face milled gears have a constant slot width while face milled gears have a tapered slot width.
Five-Cut Process and Completing Process
The manufacturing of face-milled spiral and hypoid gear sets can be accomplished by using the “Five-Cut Process” or by the “Completing Process.”
Early production of face-milled gears utilized the Five-Cut Process, which consists of five independent operations—two operations to finish the gear, and three operations to finish the pinion. The gear is roughed out using an alternate blade roughing cutter, then finished in a second operation with an alternate blade finishing cutter. An alternate blade cutter has an inside blade in one slot in the cutter head and an outside blade in the adjacent slot, so both sides of the tooth slot are cut in one operation. The first operation on the pinion is a roughing operation with an alternate blade roughing cutter. The second and third operations on the pinion involved cutting each flank separately in different operations. The pinion convex flank is finished with a cutter having inside blades only, and the pinion concave flank is finished with a cutter having only outside blades. Many companies are still utilizing the Five-Cut Process in production; however, most companies have switched to the completing process.
In the completing process, both sides of the tooth slot are finished with a single cutter in one operation from a solid blank. The cutters used for completing have alternate blades (inside and outside). Some cutter systems also use what is called a bottom blade in addition to the inside and outside blade. The completing process is applicable to either face milling or face hobbing.
In 1996, a significant improvement was introduced in the production of spiral bevel and hypoid gears. At the IMTS Show in Chicago, Powercutting was introduced. By definition, Powercutting is the process of producing gears at high speeds with or without the use of coolants. This is achieved using stick blades made out of carbide material with a special tool coating. Since its introduction, almost all bevel cutting machines manufactured today are arranged for high-speed cutting with carbide blades without the use of any coolant. The advantages of high-speed cutting with carbide are significant. The cycle times are reduced, the tool life is improved, the gear quality is better, and the elimination of the coolant in the cutting process is environmentally friendly. (The production analysis example in the
online Appendix 1 expands on this.)
Cutter Systems
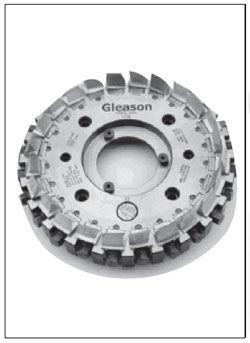
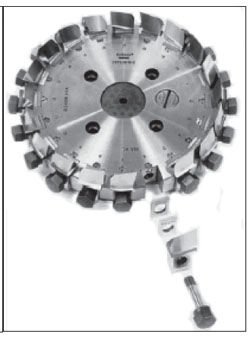
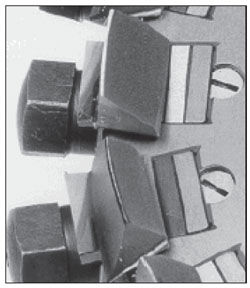
There are different cutter systems to choose from, depending on the method of producing gears and the supplier of the cutter system. In the early days of producing spiral bevel gears by the single-indexing method, cutters were available in three general types—integral blade, segmental or inserted blade. Integral blade cutters are also called solid body cutters with the blade solid with the head. Segmental cutters have groups of blades bolted to the cutter head. Inserted blade cutters have individual blades bolted to slotted heads as shown in Figures 9–11.

Figure 9—Inserted blade cutter for face
milling.

Figure 10—Face milled inserted blade cutter with parallel and shim used for mounting and truing blades on cutter head.

Figure 11—Inserted blade face mill cutter with alternate inside and outside blades.
The inserted blade circular face mill cutters can be used for single-side cutting (fixed setting) by using all inside blades or all outside blades in the cutter head. They can also be used for roughing and completing by using alternating inside and outside blades. Some cutter systems offer a third blade in the group, called a bottom blade. The blades have curved side relief and are sharpened in the cutter head by grinding the face of the blade only. The blades are bolted radially to the circumference of the cutter body. Parallels and tapered shims between the blade and cutter body are used for mounting and truing the blades (Fig. 10).
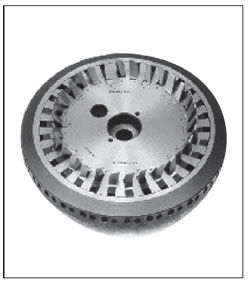
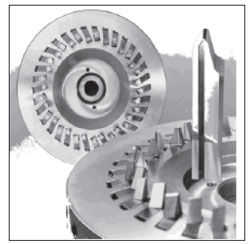
A stick blade cutter system for face milling was introduced in the 1970s (Fig. 12). Stick blade systems allow for more blades to be placed in the cutter head. The cutter heads (cutter body) have precision-ground slots for exact radial and angular location of the blades. Stick blade systems for face milling include the Gleason RSR® and Klingelnberg ARCON® systems (Ref. 4). Klingelnberg has a face mill system called Twin Blade that utilizes blades with zero degree rake angle and a blade width such that each blade cuts both the convex and concave flanks of the work (Ref. 5).

Figure 12—Stick blade cutter system for face milling.
Stick blade systems for the face hobbing operation (Fig. 13) are always used in a completing process where the tooth slot is completed in one cut. The cutter head slot locations and orientation for face hobbing are more complex than for face milling. Early cutter systems utilized a three-blade configuration in the blade grouping consisting of an inside blade, outside blade and a bottom blade. Current cutter systems such as the Gleason TRI-AC® system and Klingelnberg SPIRON® system use only an inside blade and an outside blade for face hobbing (Ref. 4).

Figure 13—Stick blade systems for face hobbing are used during the completing process where the tooth slot is completed in a single cut.
Stick blades cannot be sharpened in the cutter head, but all relief surfaces are ground during sharpening, which means blade pressure angles and blade curvatures can be changed during the sharpening process. This is a significant advantage over the circular face mill cutters shown in Figures 9–11.
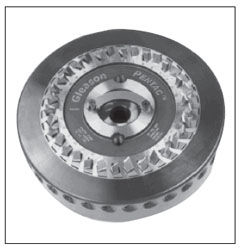
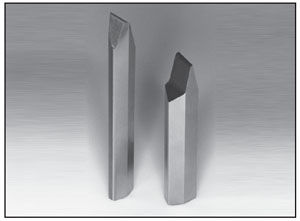
In the late 1990s Gleason introduced a stick blade cutter system called PENTAC® (Fig. 14), which has a positive three-point seating surface with a 60º / 30º pentagon-shaped stick cross-section (Fig. 15). The cutter head and blade design offer a more rigid system and allow for easier cutter building and truing. PENTAC® style blades are available for either face milling or face hobbing. This cutter system offers improved ease of assembly and blade truing over the other stick blade systems.

Figure 14—Gleason’s PENTAC® stick blade cutter system.

Figure 15—Gleason stick blades.

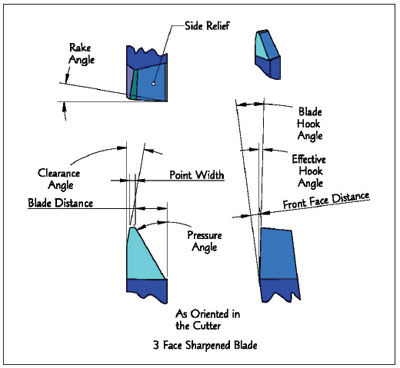
Figure 16—A three-face sharpened blade.
Profile (Two-Face) and Profile Plus Front Face (Three-Face) Sharpening.
Some stick blade systems have pre-raked front faces. If new blades are coated, it is only necessary to sharpen the top, pressure angle and clearance angle of the blade, which is the traditional method of sharpening. This method of sharpening preserves the coating on the front face, and it is not necessary to coat the blade after every sharpening.
It has been demonstrated that with fully coated (all-around coated) blades, the tool life can be improved by a minimum of 50%. When considering re-coating of blades after every sharpening, it is necessary to consider the additional cost of stripping, recoating, and stocking additional blades. These costs must be evaluated against the benefits of additional tool life.
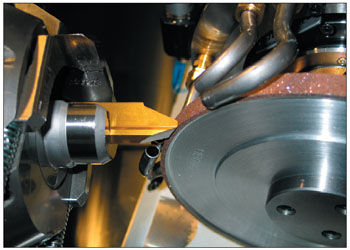
One of the difficulties with using all-around coated blades is the effective reclaiming of the surfaces for re-coating. Most chemical or mechanical means of stripping blades often result in surface finish deterioration, and cobalt leaching in the case of carbide blades. It is possible to mask the substrate so that the coating is applied only to the sharpened profile. A reliable method of reclaiming the surface is to add the grinding of the front face during sharpening. This additional step will remove the coating off all surfaces, and thus the blade is automatically reclaimed for all-around coating.
Cutting Tool Materials
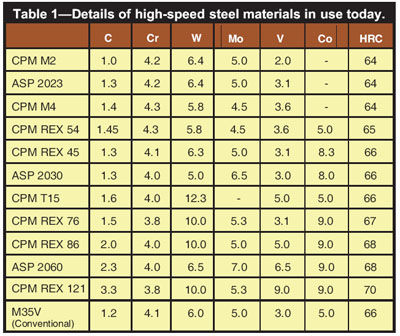
Early cutting tool materials (from the 1900s–1940s) consisted of high-speed steels designated as 18-4-1, which consisted of 18% tungsten, 4% chromium and 1% vanadium (Ref. 6). Today, we have many materials to choose from. Table 1 lists high-speed steel materials in use today, their chemical composition and Rockwell C hardness.

With the advent of cutting gears without coolant, carbide materials are the choice for bevel gear cutting operations today.
Cemented carbides are a range of composite materials that consist of hard carbide particles bonded together by a metallic binder. The proportion of carbide phase is generally between 70–95% of the total weight of the composite.
From experience gained over many installations using dry carbide cutting, the ISO “K” grade extra-fine grain carbide is found to be the most appropriate grade for bevel gear cutting operations. ISO “K” grades of carbide are a simple two-phase composition consisting of tungsten carbide (WC) and cobalt (Co). A typical composition of a “K” grade carbide is 90% WC and 10% Co by weight. “K” grades have good edge stability and abrasion resistance with a grain size range of 0.5–0.9µm.
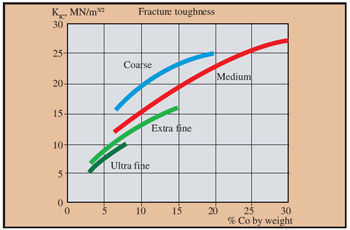
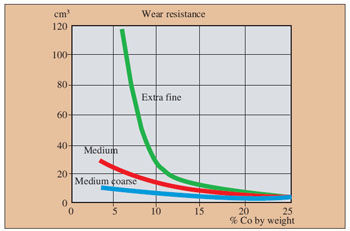
When initial trials for dry carbide cutting began, experiments were conducted on a variety of carbide grades and a range of 6–12% cobalt. At that time, 10% cobalt was selected as the best compromise for a “standard” blade material. More recently, cutting high wear-resistance steels has indicated an advantage using carbides with 6% cobalt. However, the increase in brittleness can lead to edge chipping in production. Note that increasing the cobalt content increases the toughness of the material, but decreases the wear resistance (Figs. 17 and 18). Other carbide specifications may be an advantage for a particular application based on the material composition, structure, and hardness.

Figure 17—Fracture toughness as a function of the Co content for different WC grain sizes.

Figure 18—Wear resistance as a function of the Co content at different WC grain sizes according to ASTM B611-85 test method.
The following figures show some of the relative material properties of carbide and steel.
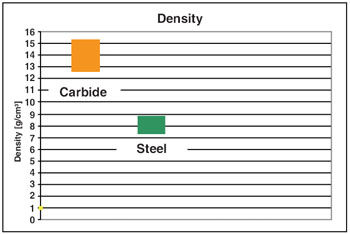
The density of carbide (Fig. 19) is nearly twice that of steel. This means that a carbide blade with the same geometric characteristics as a high-speed steel (HSS) blade is much heavier.

Figure 19—Carbide density is double that of steel.
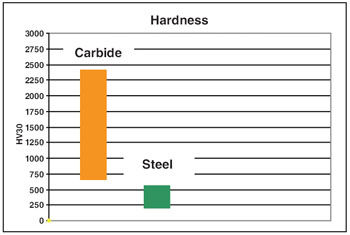
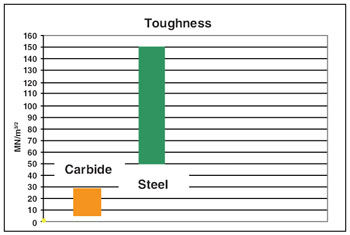
Carbide is also much harder (Fig. 20) than steel, and is not as tough (Fig. 21). Think of toughness as the ability to resist fracture. This means that if you drop an HSS stick blade you may just put a ding on the blade, but if you drop a carbide blade it may shatter into pieces. Because of these properties, you must take certain precautions with the carbide blades that you normally would not take with the conventional HSS blades.

Figure 20—Carbide hardness is greater than steel.

Figure 21—Steel is tougher than carbide.
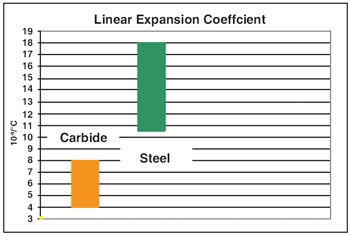
The linear expansion of carbide (Fig. 22) is less than half that of steel. This is not a significant characteristic as it relates to bevel cutting, but it is in the world of cylindrical hobbing. This is due to the fact that if you are using a shell-type carbide hob with a steel hob arbor, the hob arbor will expand at a greater rate than the carbide hob, and you must account for this thermal expansion difference in the clearance between the hob bore and the steel arbor. Otherwise, the hob may shatter (Ref. 7).

Figure 22—The linear expansion of carbide is less than half that of steel.
Coatings
Tool coatings came to the market in the 1980s. The most popular at the time was TiN (Titanium Nitride). This coating served well for high-speed steel applications used with a coolant.
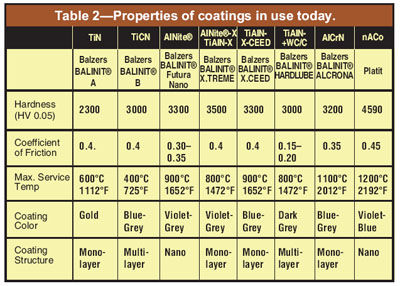
Titanium Aluminum Nitride (TiAlN) was developed in the mid-eighties and gained popularity in the 1990s as a coating for blades for use in cutting hard materials and high-heat applications. It proved to be the coating of choice for dry carbide cutting applications. The coatings used in gear production today are primarily AlNite® (Balzers Balinit® FUTURA NANO), TiAlN-X (Balzers Balinit® X. TREME), and AlCroNite™ (Balzers Balinit® ALCRONA). The performance of AlNite® and TiAlN-X are about the same, although some customers prefer one over the other. AlCroNite™ (Balzers Balinit® ALCRONA) has shown advantages for a number of applications over the other coatings. Trials with Balinit® X.CEED and Hardlube were also conducted, but did not show any significant advantage.
Following is a brief description of coatings used for gear cutting tools:
AlNite® (Balzers Balinit® FUTURA NANO)—AlNite® is a single-layer TiAlN coating with a nominal 50:50 ratio of Titanium to Aluminum. It has high thermal stability and can be used for cutting all steels, cast iron and stainless steel, and may be used wet or dry.
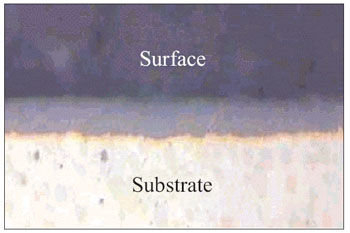
AlNite®-X (TiAlN-X, Balzers Balinit® X. TREME)—AlNite®-X is a single- layer coating of TiAlN. It is specialized for carbide mills for hardened steel workpieces (>50 HRC). It may also be used wet or dry. See Figure 23.

Figure 23—Single layer X.TREME coating.
TiAlN-X.CEED (Balzers Balinit® X. CEED)—X.CEED is a high deposition temperature, high aluminum single-layer coating, appropriate only for cemented carbide substrates. It is designed for aerospace materials including Titanium and Inconel.
Hardlube (Balzers Balinit® Hardlube)— Hardlube is a duplex coating consisting of a wear-resistant TiAlN base layer and a high-lubricity (low friction coefficient) WC/C top layer designed for ease of chip extraction in deep hole drilling/tapping applications.
AlCroNite™ (Balzers Balinit® ALCRONA)—ALCRONA is a high- performance, titanium-free coating (AlCrN) of the G6 generation. It has exemplary wear resistance under both conventional conditions and severe mechanical stresses.
nACo® (Platit)—nACo is a true nanocomposite coating comprised of AlTiN nano sized particles embedded in an amorphous (non crystalline) matrix of silicon nitride (Si3N4). This coating has the highest reported oxidation resistance of any current coating and is ideal for dry machining. It is readily strippable and environmentally friendly from both high-speed steel and K-grade carbide materials.
Table 2 lists some of the properties of coatings in use today (Ref. 8).

Yesterday’s and Today’s Cutting Machines
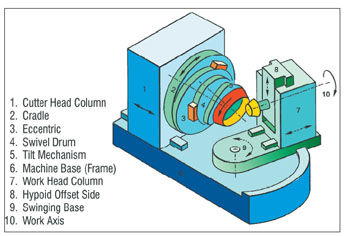
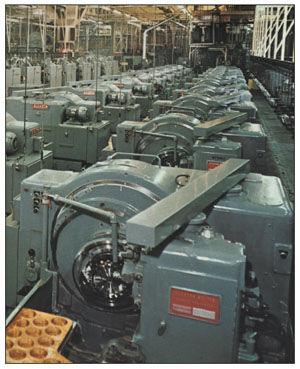
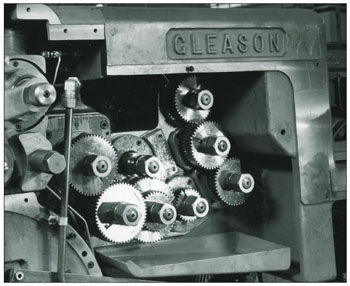
The early mechanical machines used to produce spiral bevel gears were known as traditional cradle-style machines. The cradle concept was used by all manufacturers of bevel and hypoid gear machines. The early machines consisted of many components, as shown in Figures 24 and 25, such as machine base, work head column, cutter head column, cradle, eccentric swivel drum, tilt mechanism, hypoid offset slide, swinging base and work axis.

Figure 24—Early cutting machines consisted of many components.

Figure 25—Some of the components in the early cutting machines are machine base, work head column, cutter head column, cradle, eccentric, swivel drum, tilt mechanism, hypoid offset, swinging base and work axis.
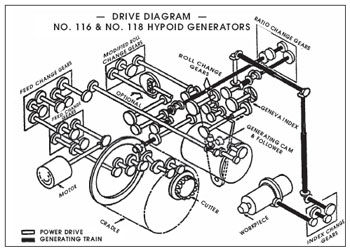
These machines also had very complex gear drive trains, as shown in Figures 26 and 27.

Figure 26—A drive diagram of a hypoid generator.

Figure 27—The complexity of a gear train.
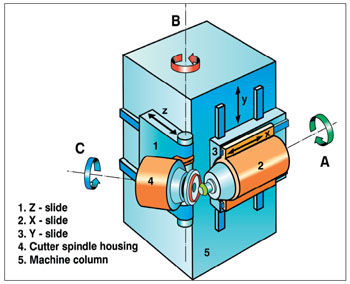
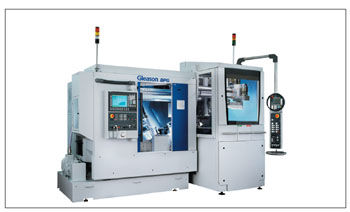
As you would expect, today’s cutting machines are radically different from earlier machines. The modern machine employs CNC controls, has high-speed spindles for both the work and cutter, and utilizes direct-drive technology. Today’s machines produce gears at very high speeds, but the machine itself may not contain any gears. The machines are very ergonomic—easy to load and unload parts, and easy to change cutters. Many machines today are equipped with various configurations of automation for loading and unloading parts. Robots are also employed for loading, and they sometimes handle more than one machine.
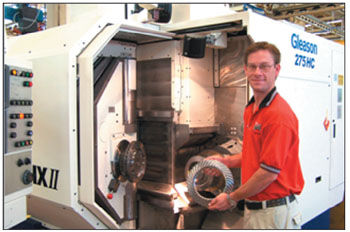
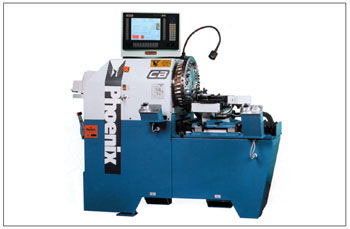
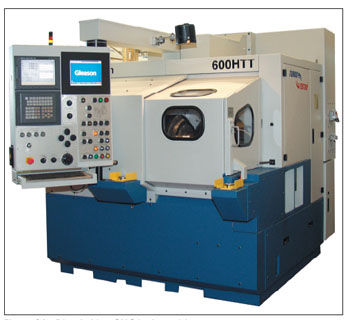
Figure 28 shows the latest concept in machine design. The monolithic column design represents leading edge technology to design for chip flow, ergonomics, stiffness, cutting process, and maintainability. Figure 29 depicts an actual cutting machine based on the monolithic design. Note the location of the cutter and workpiece for easy loading and unloading.

Figure 28—Monolithic column design shows modern technology that’s designed for chip flow, ergonomics, stiffness, cutting process and maintainability.

Figure 29—Real-life cutting machine based on a monolithic design.
Machine Runoff Requirements
Machine tool manufacturers supplying machines to the gearing world have been in existence for many years. The machines have changed, and so has the acceptance criteria for the machines. Before the 1980s, the criteria for virtually all machine acceptance was either a supplier’s standard test job or the supplier producing one or two of the customers’ parts to within a print tolerance. Around 1984, requirements were given to perform a capability analysis for a machine acceptance on a cylindrical hobbing machine.
Capability requirements for bevel machine acceptance did not occur until several years after that. Today, virtually every customer requires a capability study on at least one parameter for at least one type of part.
Since the introduction of capability requirements for machine acceptance, the goal post has moved. Initially the requirement was for a Cp or Cpk of 1.33 using a Six Sigma analysis. Now we have seen requirements of a 1.67 or 2. 0 Cp or Cpk with a Six, Eight or Ten Sigma analysis on tolerances that have been tightened from the original tolerance. This can cause some real headaches for the machine tool supplier, and that is why it is very important for the supplier to understand the true machine and process capability before agreeing to any capability requirement (Ref. 9).
Additional Considerations for Producing Bevel Gears
Just having a cutter body, blades, and a cutting machine is not enough for gear production. The blades need to be sharpened, inspected, assembled, and trued in the cutter head. Modern equipment exists today for all the abovementioned activities, and examples are depicted in the figures below.
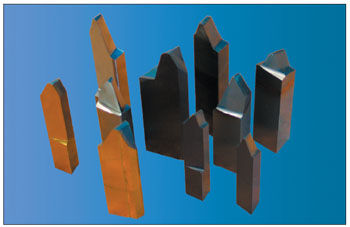
Figure 30 is a stick blade sharpening machine. Using dressable wheels, the machine can sharpen stick blades of high-speed steel or carbide material. The process can sharpen blades for two-face or three-face applications in less than two minutes. Block blades (blades with no profile form) can be sharpened to a finished profile economically, taking between four and ten minutes per blade, depending on the blade size and material. The blade grinder is network-capable for closed-loop design, inspection and correction systems, as will be discussed later. Figure 31 is a close-up of the grinding wheel and stick blade. Figure 32 demonstrates the variety of sizes and types of blades that are used in production today.

Figure 30—Stick blade sharpening machine.

Figure 31—Sharpening a stick blade.

Figure 32—Various sizes and blade types can be used in production today.
Blade inspection machines exist that can measure the key characteristics of a stick blade: pressure angle, clearance angle, hook and rake angle, blade distance, top width, TOPREM® etc. These machines can also measure the blade shank integrity. Results can be stored for SPC evaluation, and hard copies of the results can be printed.
Figure 33 is a machine used to assemble stick blade cutters in their heads, true the cutter, and inspect the blades in the head. The unit will measure the axial and radial runout of the assembled blades. In general, it may take 40–45 minutes to build, true and inspect the cutter assembly, depending on the accuracy desired.

Figure 33—Machine used to assemble, true and inspect stick blade cutters.
Spiral Bevel and Hypoid Gear Inspection
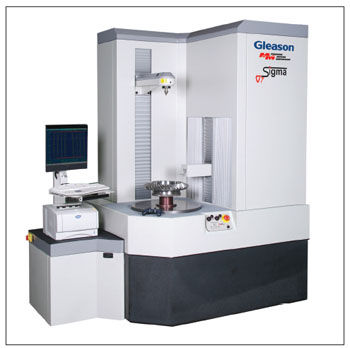
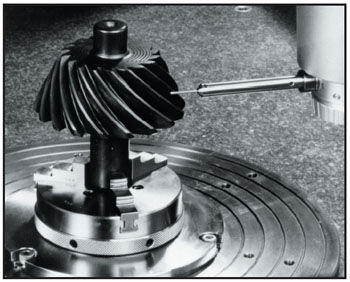
Figure 34 is a CMM (Coordinate Measuring Machine) used to inspect the gear or pinion. Flank form, spacing characteristics, tooth thickness, etc., are characteristics that are measured. See Appendix II (online) for a typical CMM output. Figure 35 is a close-up of a pinion being measured.

Figure 34—CMMs inspect various parameters on a gear.

Figure 35—Close-up of a pinion being measured.
Figure 36 is a direct-drive CNC test machine that can auto mesh a gear set, set the backlash automatically and test the set for contact pattern, single flank or structure-bourne noise.

Figure 36—Direct-drive CNC test machine.
Networking Machines and Automated Corrections
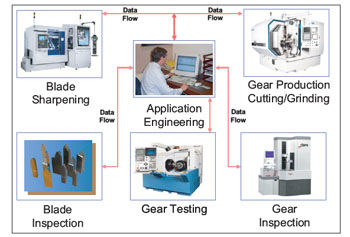
PCs or servers running gear software programs can be networked to the various gear production equipment described above for closed-loop gear design, production, inspection and correction. Figure 37 is an example of a network arrangement and data flow.

Figure 37—Network arrangement and data flow.
The application or design engineers use a WINDOWS®-based bevel design software package to input basic gear parameters, tooling, manufacturing methods and machinery. The design software can include TCA (Tooth Contact Analysis) and FEA (Finite Element Analysis). Machine settings are generated and electronically transferred to the cutting/grinding machine. Likewise, inspection data is generated and transferred to the inspection machines. If corrections to the inspected gear, pinion, or blade are required, the software will automatically calculate the new machine settings and transfer these new settings back to the machines, completing the closed-loop design and manufacturing process.
Conclusion
Gear cutting technology has advanced over the years with improvements in machinery, software, cutting tools and coatings. Today, one machine cutting gears or pinions without coolant using coated carbide tools can replace three to four machines cutting the same gear/pinion with conventional high-speed steel tools. What lies ahead is a continuation of the cycle—more innovations in the machines, new tool materials and even better tool coatings, resulting in the improved economy of gear production.
Appendices
References
1. Maiuri, T. J. “Synopsis of the Evolution of Gear Hobbing,” The Gleason Works, Rochester, New York, May 1999.
2. Dudley, Darle W. The Evolution of The Gear Art, American Gear Manufacturers Association, Washington D. C., 1969.
3. Hotchkiss, Roger G. “The Evolution of Bevel Gear Manufacturing,” American Gear Manufacturers Association Gear Manufacturing Symposium, Cincinnati, Ohio, 1989
4. Bosch, M. , K. Ozdyk, H. J. Trapp. “ARCON® and SPIRON® New Stick Blade Cutter Head Systems for Dry Machining,” Klingelnberg GmbH, Hückeswagen, Germany, DATE.
5.“TWIN Blade,” Sigma Report, Technical Magazine of the Gearing Partners Klingelnberg and Liebherr, No. 13/2004.
6. Marks, Lionel S. Mark’s Handbook, Fourth Edition, McGraw Hill Book Company, Inc, New York, 1941.
7 . Maiuri, T. J. “Brief Synopsis of Carbide Wet and Dry Hobbing,” The Gleason Works, Rochester, New York, September 1997.
8. Balzers, Inc. website www.balzers.com.
9. Platit, AG website www platit.com, August 3, 2005.
10 . Maiuri, T. J. “Application of Statistical Stability and Capability for Gear Cutting Machine Acceptance Criteria,” American Gear Manufacturers Association Fall Technical Meeting, October 2002, O2FTM3, ISBN: 1-55589-803-3.
11. Stadtfeld, Hermann J. “Advanced Bevel Gear Technology for the New Millennium,” The Gleason Works, Edition 2000.
12. Stadtfeld, Hermann J. “Face Hobbing-Lapping or Face Milling-Grinding—A Question of Application and Environment?” The Gleason Works, August 2006.
13. Stadtfeld, Hermann J. “Phoenix® II—The Future of Bevel Gear Cutting and Grinding,” The Gleason Works, August 2001.
Phoenix®, RSR®, TRI-AC®, and PENTAC® are registered trademarks of The Gleason Works.
ARCON® is a registered trademark of Klingelnberg GmbH, Hückeswagen, Germany.
SPIRON® is a registered trademark of Klingelnberg AG, Zurich, Switzerland.
Balinit® is a registered trademark of Balzers AG.
nACo® is a registered trademark of Platit AG.
This article is an updated version of a paper previously published by the American Gear Manufacturers Association. It is presented with the permission of the copyright holder, the American Gear Manufacturers Association, 500 Montgomery St., Suite 350, Alexandria, VA 22314-1560. Statements presented in this paper are that of the author and may not represent the position or opinion of the American Gear Manufacturers Association.
T.J. “Buzz” Maiuri is manager of application engineering at The Gleason Works in Rochester, NY, where he has worked for the past 40 years. He graduated from Rochester Institute of Technology with a bachelor of science in mechanical engineering. Maiuri has authored technical papers for Gleason, AGMA and numerous magazines as well as presented lectures for SME and ASME gear seminars.

