Small-Module Gear Design
Small-Module Gear Design
ASK THE EXPERT
With small-module gear design, how does one define pressure angle and module? Which factor should we take into account?

Alex Kapelevich possesses more than 30 years of custom gear research and design experience, as well as over 100 successfully accomplished projects for a variety of gear applications. His company, AKGears, provides consulting services from complete gear train design (for customers without sufficient gear expertise) to retouching (typically tooth and fillet profile optimization) of existing customers designs in the following specific areas: traditional or direct gear design; current design refinement; R&D; failure and testing analysis. The company provides gear drive design optimization for increased load capacity; size and weight reduction; noise and vibration reduction; higher gear efficiency; backlash minimization; increased lifetime; higher reliability; cost reduction; and gear ratio modification and adjustment. Kapelevich is the author of numerous technical publications and patents, and is a member of the AGMA Aerospace and Plastic Gearing Committees, SME, ASME and SAE International. He holds a Ph.D. in mechanical engineering from Moscow State Technical University and a Master Degree in mechanical engineering from the Moscow Aviation Institute.
Expert Response provided by Dr. Alex Kapelevich, AKGears, LLC (www.akgears.com)
Gears with a diametral pitch 20 and greater, or a module 1.25 millimeters and lower, are called fine-pitch or low- module gears. The design of these gears has its own specifics. A small tooth size makes fine-pitch gears more sensitive to manufacturing tolerances and operating conditions than the coarse-pitch gears.
Manufacturing tolerances include gear tolerances (tooth tip diameter, tooth thickness at the pitch diameter, and run-out); housing center distance tolerance; allowable gear axis misalignment; etc. Operating conditions may include the gear housing and shafts deflection under load; a temperature range resulting from gear drive component thermal expansion or shrinkage (especially for dissimilar materials); and a humidity range that affects some plastic components. All these factors should be taken into consideration for fine-pitch gear design.
For a given gear accuracy grade, the fine-pitch gear tolerances relative to the tooth size are much greater in comparison to coarse-pitch gears. For example, according to the AGMA 2000-A88 accuracy standard, the grade Q8 total composite tolerance (aka TTE) for a 0.3 millimeter module, 30-tooth gear is 0.036 millimeters, but for a 3.0 millimeter module, 30-tooth gear it is 0.110 millimeters. The gear size is increased by 10 times, but the TTE is increased only by 3 times. Another example: according to the ISO 1328-2 accuracy standard, the grade 8 runout tolerance for gears with a pitch diameter between 20 and 50 millimeters and module between 0.5 and 2.0 millimeters is 0.032 millimeters. The gear pitch diameter and tooth size (module) can vary 2.5 and 4 times, accordingly, but the run-out tolerance remains the same. This explains why the given tolerance for the gearbox housing center distance is easy to absorb by coarse-pitch gears, rather than the fine-pitch ones that could have a contact ratio below 1.0 or even totally separated when the center distance is at its maximum value. A wide operating temperature range for dissimilar material gears and housing aggravates this problem. For example, steel fine-pitch gears inside an aluminum housing may properly work at ambient temperature, but at high operating temperature the center distance will be increased because of greater housing expansion, and fine-pitch gears could be separated. An opposite issue arises when fine-pitch plastic gears are in an aluminum housing. At cold temperature the fine-pitch plastic gears are getting smaller and could get separated; at high temperature they grow greater than the housing and could become jammed. Some gear polymers, like nylons, are also sensitive to humidity. They are smaller at dry conditions and grow with high humidity.


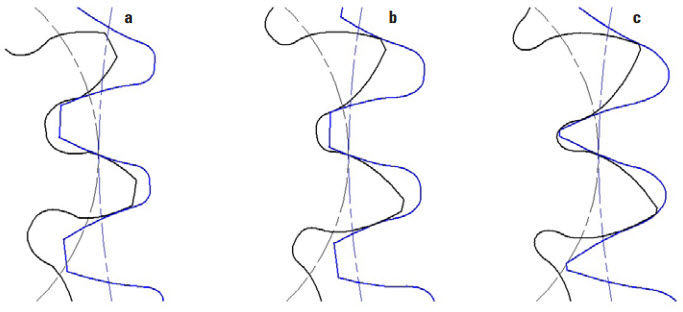
 Figure 1 Gear meshes of 10 and 40 tooth gears; a — standard (pressure angle 20°, X-shifts 0 and 0, contact ratio 1.08), b — standard (pressure angle 20°, X-shifts +0.5 and -0.5, contact ratio 1.40), c — nonstandard (pressure angle 22.5°, contact ratio 1.70)
