Detecting Gear Noise
Unloaded Tooth Mesh
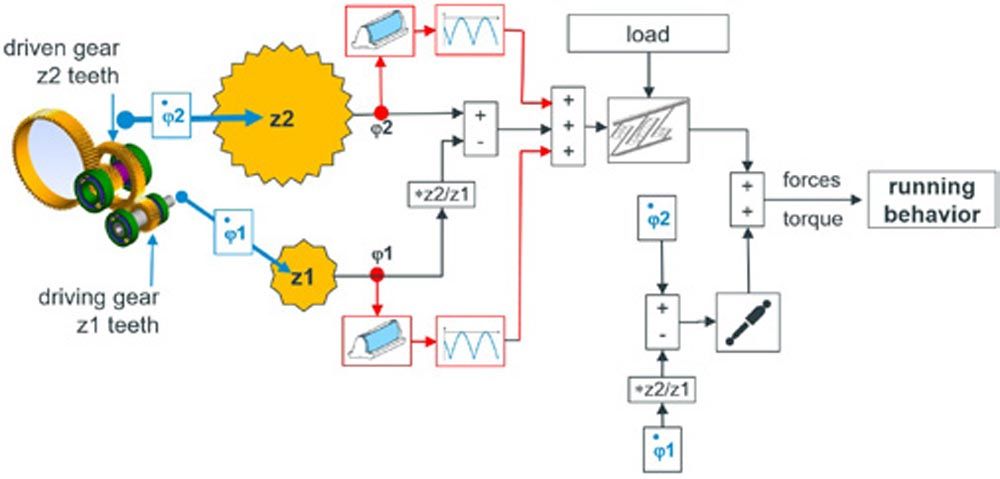
It often happens in series production that gears are inside their geometrical tolerance limits but some of them do not perform acceptably in noise behavior. In case such a phenomenon occurs in the End-of-Line test, expensive disassembly, and root cause analysis needs to be done. Avoiding fault repair in gearbox assembly a method of fishing out critical gears before assembly is desirable. Figure 3 shows the different influences on the running behavior of mating gears.
Three groups of influencing parameters can be distinguished:
- flank from modifications including machining imperfections
- load-induced displacements and deflections
- damping characteristics of the transmission assembly
When addressing the phenomena of some gears of a batch performing not acceptable in noise, considering effectual alternations in manufacturing and assembly is required. Damping characteristics and material specifications will not show a substantial effect, but flank form modifications and additional machining imperfections will occur in gear machining.
The good news is that the unloaded tooth mesh is sufficient to forecasting the noise. All variations in flank geometry are detectable in the unloaded tooth mesh. Figure 3 shows in red color the critical influences on noise excitation caused by tooth mesh (Ref. 1).

Figure 3—Influences on the running behavior of mating gears.
Waviness Analysis
Gear metrology and Closed-Loop applications control nowadays flank form modifications in a perfect manner. Nevertheless, small surface defects are not the focus of gear metrology. In particular, regular surface defects are critical in terms of noise excitation. Profile and lead form errors in metrology evaluation standards are only a rudimentary approach to detecting regular surface defects like waviness.
Gear metrology must be capable of checking waviness with amplitudes down to 100 nanometer. In case a capable measuring device exists, waviness analysis is an appropriate tool for detecting noise-critical gears. As a matter of course a correlation between transmission noise and waviness amplitudes of orders must be given.
Roll Testing
Two-Dimensional Analysis of Gear Flanks
Waviness analysis is limited to checking in one dimension in profile as well as in lead direction whereas roll testing allows checking the flank surface in two dimensions by means of meshing teeth. Several roll test methods for detecting noise are applicable.
SFT–Single Flank Test
In SFT the gear and a master gear are in quasi-static tooth mesh. High-resolution encoders capture the rotational positions of gear and master gear. The SFT result is the difference of the rotational position given by the number of teeth and the captured angular positions. SFT shows the quality of the mesh transmission precision. The advantage of this quasi-static measurement principle is the high repeatability and results in consistency on different test equipment.

Figure 4—SFT with mesh transmission error.
Figure 4 shows the SFT result of a gear with 37 teeth. The mesh transmission error is the black graph. For better understanding, the mesh transmission error is decomposed into the blue long-wave content and the green short-wave content.
SFT allows detecting precisely the tooth mesh deviation. However, SFT only works with reduced rotational speed since no parasitic effects are allowed in order to avoid an influence of the test equipment in the mesh transmission error results. Even SFT is significantly faster than a waviness analysis on a gear inspection machine. Still, SFT is in most cases not able to support a 100% check of all gears in a 1:1 ratio of gear processing machine and SFT tester.
SBN–Structure-Borne Noise
In contrast to SFT SBN is a very fast method. The rotational speed for testing is from 500 to 2,000 rpm. Instead of rotational encoders, a vibration sensor records the vibration of the SBN test equipment. Even though this test principle focuses on exciting eigenmodes of the gear environment there is a difference to the real gearbox. Instead of exciting the eigenmodes of the gearbox assembly, SBN excites the eigenmodes of the test equipment. Nevertheless, SFT gives a clear indication about tooth mesh exciting eigenmodes, especially for higher frequency ranges.
TAT–Torsional Acceleration Test
The torsional acceleration test runs at the same speed, like SBN. The difference to SBN is the type of sensor equipment used to capture the vibration. SBN processes the signals of a three-axis acceleration sensor, whereas TAT uses rotational accelerometers in the workpiece and master gear spindle. TAT only records the rotational acceleration caused by the tooth mesh. Therefore, the dynamic impact of the test equipment comes much less into effect. For getting the torsional acceleration without any influence of the test equipment the second derivative of SFT results needs to be computed—with the disadvantage of a longer measuring time due to the quasi-static condition of SFT.
Describing Gear Noise
Order Spectrum
SFT, SBN, and TAT results show the respective sensor data over the rotational position of the workpiece and the master gear. For getting quantitative numerical values, a Fourier-transform is applied to result in an order spectrum. Instead of looking at deviations in each rotational position, the order spectrum tells, how often per revolution an incident happens and how big this incident is. Figure 5 shows the order spectrum of the SFT result shown in Figure 4.
The order spectrum gives a detailed look into the tooth mesh operation. In the example of Figure 5, the peaks in order 37 and multiples of it are tooth mesh orders. The amplitudes of these orders mainly arise from flank form modifications. The orders between the tooth mesh orders are so-called ghost orders. Only machining imperfections cause ghost orders.

Figure 5—Order spectrum.
The first order for example originates from the workpiece runout. This incident happens once per revolution. The orders close to tooth mesh orders are so-called sidebands caused by indexing errors. The ghost orders between 148 and 185 are provoked by parasitic machine dynamics or from external environmental influences on the machine-like foundation vibrations.
Order spectra of gears in general show a multitonal characteristic and create an annoying noise experience. The task is to design an order spectrum with lower amplitudes in tooth mesh orders and a higher number of sidebands and ghost orders with rather low amplitudes taking a certain share of the vibration energy induced by the tooth mesh.
Psychoacoustic Metrics
The vibration energy excited by the tooth mesh spreads over all orders of a spectrum. A gear without any machining imperfections shows an order spectrum without sidebands and without ghost orders. Here the vibration energy can only distribute on tooth mesh orders. Even a low sound pressure level of such a gear may give an annoying acoustic experience due to high tonality. An order spectrum with side bands and ghost orders creates a higher sound pressure level but the sound perception might be less unpleasant to the ear.
Gearbox noise is significantly quieter than most all other vehicle sounds. Nevertheless, it is an annoying noise due to its tonal character. The aim of applying psychoacoustic properties is to objectify the subjective impression of an assessor by using mathematical methods matching subjective evaluation with objective measurable variables (Ref. 2).
The annoyance of gear noise is whining, humming, and rattling. When applying psychoacoustic principles, only those properties are relevant correlating with typical gear noise. Therefore, the focus is on the following four psychoacoustic properties (Ref. 3).
- Loudness: Is the perceived intensity of a sound, measured in Sone. Calculating Loudness in Sone considers frequency, bandwidth, length of time, and sound pressure level. The Loudness in Sone is proportional to the perception of the sound intensity of a human ear.
- Tonality: Is a measure for the existence of singular tones calculated in Mel. Tonality becomes high when single frequencies or narrow-band noises obtrude in relation to the remaining noise. Tonality correlates with the annoyance of subjective sound perception.
- Fluctuation strength: Describes the decrease and increase of sound in case frequencies of a sound are close together. This effect is perceived as a pulsating or humming noise and causes alertness. The unit of fluctuation strength is Vacil.
- Sharpness: In case a noise excitation changes rapidly and contains high frequencies, a rough sound impression is perceived. Calculating the sharpness is based on the spectral concentration of the loudness. The unit of Sharpness is Acum.
Computing these properties is not possible with simple formulas. Complex algorithms are needed (Refs. 4, 5, and 6). Besides the mathematical evaluation of these four psychoacoustic parameters based on the order spectrum, there is an easy-to-understand correlation.
- The level of amplitudes correlates to the loudness.
- If single orders are prominent in the spectrum, the tonality becomes high.
- A high fluctuation strength indicates that low orders have a high amplitude causing a humming noise.
- A high sharpness value is a clear hint that amplitudes of sidebands are too high.
Psychoacoustic properties help to interpret an order spectrum of SFT, SBN, or TAT with regard to the expected subjective human noise perception.
Influencing Gear Noise
Loudness in the Design Phase
The basic noise behavior of a transmission is defined in the design stage. Macrogeometry and flank form modifications determine the amplitudes of the tooth mesh orders. Improving the psychoacoustic property of loudness the mesh transmission error must be minimized in the design stage. Counteracting flank form modifications are needed to cope with load-induced and tolerance-caused displacements and deflections.
Before flank form modifications are applied the gear macrogeometry needs to be designed properly. A high contact ratio takes care of a high number of teeth being engaged simultaneously. This provides load sharing leading to an improved load-carrying capacity and a lower mesh transmission error. Influencing design parameters of the contact ratio are tooth height, helix angle, and module.
If the macro design is not well done, noise optimization in a later stage will not be successful.
Tonality, Fluctuation Strength, and Sharpness in the Manufacturing Phase
In the case of noise-sensitive gears like in e-mobility, it often happens that all gears are in tolerance but some of them fail at the end-of-line test of the assembled gearbox. Since the majority of gears perform as expected, the root cause must somehow originate in the manufacturing process.
A gear corresponding exactly to the design will only show tooth mesh orders with a low sound pressure level and a high tonality. Minimizing the amplitude of a tooth mesh order is not possible in manufacturing but masking a tonal noise will help to improve the subjective hearing impression. Partial masking reduces the loudness of a tonal noise but does not mask it completely (Ref. 7).
Adding low amplitude ghost orders and low amplitude sidebands contribute to partial masking. In case of a large runout of the gear, amplitudes of the tooth mesh orders will be reduced substantially but side band orders with high amplitudes will pop up. Such order spectra have high sharpness and will be annoying. As a secondary effect, the fluctuation strength is highly audible in a humming noise.
Influencing the order spectrum will only work when affecting the flank geometry. Since flank geometry and gear quality correlate directly, the challenge is finding measures not downgrading the gear quality but improving the partial masking effect.
In the following paragraphs, the manufacturing technology focuses on generating grinding.
Influencing the surface structure of gear flanks requires a special dressing operation of the grinding worm. When modulating the ratio of the circumferential speed ratio of the dressing roll and grinding worm during the dressing cycle, a surface effect on the grinding worm flanks is induced by devolving to the gear flanks. Some sections of the grinding worm have a higher cutting ability, some a lower. The geometrical effect on the gear flanks will be in the range of less than a micrometer and therefore not affect quality parameters.
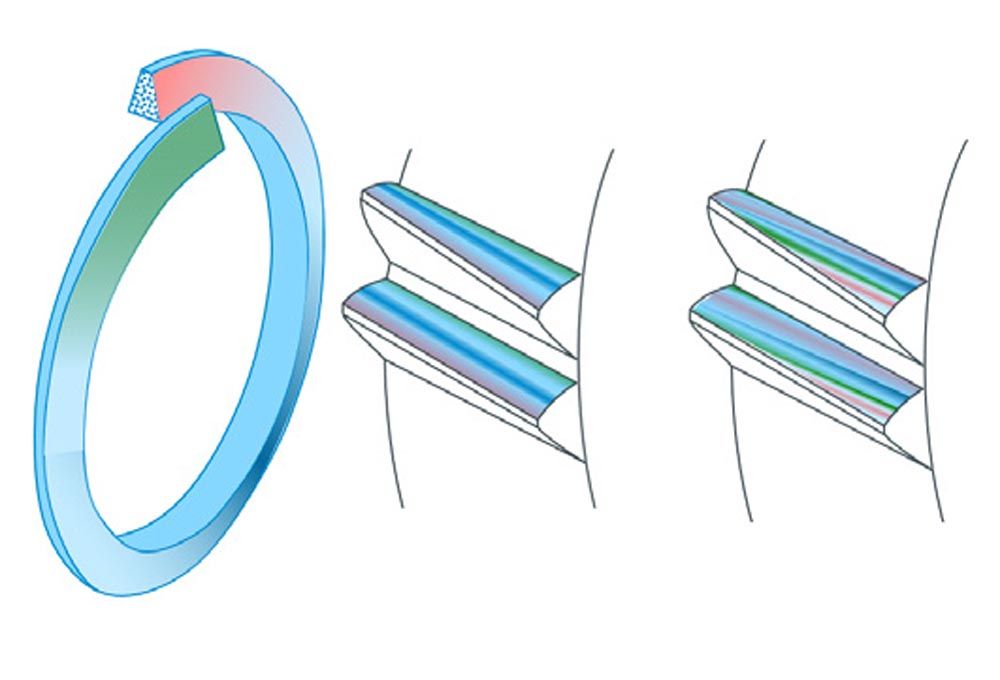
Figure 6 shows how the modulated grinding worm surface affects the gear flanks.

Figure 6—Flank surface modulation.
The left picture in Figure 6 shows one thread of a single-start grinding worm. The colors represent the surface modulation of the grinding worm. The middle picture shows a flank surface texture with a structure parallel to the root and tip. The right picture shows a flank surface inclined texture.
There are only some parameters influencing the texture of the gear flanks.
- The magnitude of the texture will increase with a higher change of speed ratio of the dressing roll and grinding worm during the dressing cycle.
- The density of the texture structure becomes more subtle when the speed ratio changes more often during the dressing cycle.
- The inclination angle of the texture increases with the shift amount per workpiece revolution.
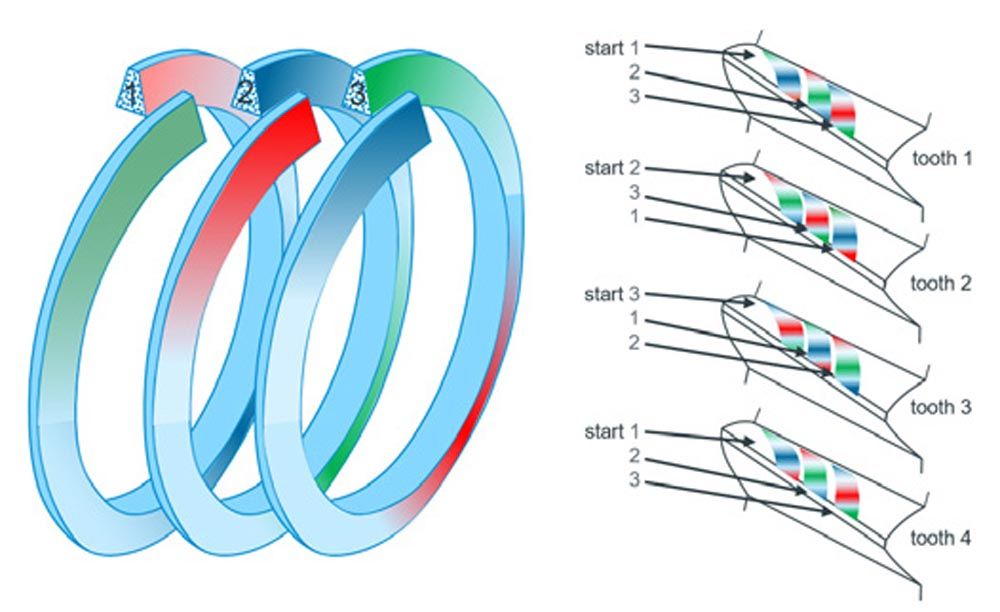
Up to now, this method will create identical teeth and therefore just affect the tooth mesh orders. Big magnitudes and a high density of the structure will increase the amplitudes of high tooth mesh orders. A fuzzy texture spreading over all the teeth will create ghost orders. Creating a fuzzy texture with a three-start grinding worm shows Figure 7.

Figure 7—Flank surface modulation.
Start 1 of the grinding worm will devolve its characteristic on tooth 1, start 2 on tooth 2, start 3 on tooth 3, and so on. After one revolution of the workpiece, the grinding worm operates due to the stroke motion along the face width on a position next to the last contact of the worm and flank. Now start 2 devolves its characteristic on tooth 1, start 3 on tooth 2, start 1 on tooth 3, and so on. When grinding the gear is finished, each flank has a slightly different surface texture and therefore the ghost orders and side bands with low amplitudes are induced in the order spectrum.
With this grinding technology called Quiet Surface Shifting (QSS), it is possible to produce gears of the highest quality and improved psychoacoustic values in loudness, tonality, fluctuation strength, and sharpness resulting in less noise annoyance of transmissions.
Summary
Physical measures like sound pressure level are not suitable for forecasting the subjective hearing experience. Psychoacoustic principles allow objectifying the subjective impression by using mathematical methods matching subjective evaluation with objective measurable variables. Roll testing provides objective measurable values represented by the order spectrum. The Quiet Surface Shifting (QSS) technology allows for improving the relevant psychoacoustic parameters loudness, tonality, fluctuation strength, and sharpness without compromising gear quality.

References
- Gacka, A., 2013, Development of a method representing dynamic tooth forces of cylindrical and bevel gears, Shaker-Verlag Volume 2013-1.
- Zeller, P., 2017, Vehicle Acoustics Manual. Basics, design, calculation, experiment, pp. 10–11. Springer-Vieweg, Wiesbaden.
- Zeller, P., 2017, Vehicle Acoustics Manual. Basics, design, calculation, experiment, p. 256. Springer-Vieweg, Wiesbaden.
- DIN 45631/A1:2010-03, Calculation of loudness level and loudness from the sound spectrum, 2010, Beuth-Verlag, Berlin.
- DIN 45681/2005-03, Acoustics—Determination of the tonality of noises and determination of a tone allowance for the assessment of noise emissions, 2005, Beuth-Verlag, Berlin.
- “Calculation of psychoacoustic parameters in the Artemis Suite,” 2018, Application Note, Head Acoustics, Aachen.
- Zwicker, E., Fastl, H., 1999, Psychoacoustics. Facts and Models. 2nd updated ed., p. 62, Springer-Verlag, Berlin.
Printed with permission of the copyright holder, the American Gear Manufacturers Association, 1001 N. Fairfax Street, 5th Floor, Alexandria, Virginia 22314. Statements presented in this paper are those of the authors and may not represent the position or opinion of the American Gear Manufacturers Association.


