Expert response provided by: Dr. Robert Winfough and N.K. (Chinn) Chinnusamy (A previous answer to this question, written by Robert Wasilewski of Arrow Gear, appeared in the May 2015 issue).
The question is quite broad, as there are different methods for setting various types of gears and complexity of gear assemblies, but all gears have a few things in common.
When assembling spur or helical gears, backlash and contact pattern are important. Depending on the precision of the gear boxes, inspecting other items prior to assembly may also be wise. Before assembling high-speed gearboxes, all gears should be visually inspected to make sure there are no burrs or damage which will contribute to noise and premature wear. The gear housing should be CMM-inspected for center distance and alignment of bores to make sure they are within the tolerance specified. When multiple gear centers are involved, it is often difficult to check backlash; hopefully the gearbox design allows for inspection access. The backlash within each mesh should be checked along with contact pattern before assembling other gear centerlines. Bearing preload or controlled looseness are also important, depending on the speed. Of course, proper lubrication of gears and bearings should be considered for long gear and bearing life.
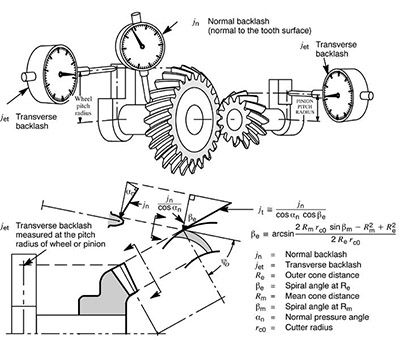
Bevel gears are generally manufactured as matched sets; individual members are not interchangeable between sets unless ground to a master. The quality of performance that is designed and manufactured into a set of bevel gears can only be achieved by correct mounting of gears at assembly. Gears assembled with improper mounting will wear excessively, operate noisily and possibly fail. Here again, checking the backlash and contact pattern should be done.
In assembling bevel gear (straight, spiral, and hypoid) the following must be observed.
Understanding of the need for correct positioning of bevel gears Inspection data necessary for correct assembly and positioning of bevel gears in the housing.
Instruction to assembly personnel for obtaining tooth contact patterns, for interpreting tooth contact patterns, and adjusting the position of members to change tooth contact patterns and backlash.
For more detailed assembly instruction, please refer to ANSI /AGMA 2008 D11 standard.
Answer provided by N.K. Chinnusamy at Excel Gear in Roscoe, IL (NChinnusamy@excelgear.com); and Dr. Bob Winfough of Hypergears LLC (info@hypergears.com).
Expert response provided by Robert Winfough: When evaluating a gear system for noise, vibration and harshness (NVH) regardless of the type of gear box, one will have design requirements of interest. Noise and vibration are often set by subjective feel and then converted to an engineering unit. In the question it is stated that there exists a 1st order and 3rd order that are only 5% different when engaging 6th gear. The question is — can one suggest a minimal acceptable difference between first-, second-, and third-order gear mesh frequency to avoid, and why?
Breaking the question into several parts might be best.
First and foremost, the lower orders of a gear box are often NOT the most significant in terms of creating issues. The order that is most important is the order that aligns with the most flexible natural mode of vibration. Aligning more than one shaft or mesh on top of these flexible natural modes is the biggest issue. These issues are the ones in which issues can be catastrophic and are often missed in design as typical modal analysis does not effectively shows the relative stiffness of the assembly.
It is most common in gear boxes to pay close attention to intentionally mismatching orders as is suggested and referenced by the comment of delta between two meshes of 5%. What is the acceptable difference? This is a difficult question as the design requirements for the gear box really control the amount of acceptance. For example the noise from a farm implement gear box and that of a luxury automobile will be different. However some physics regardless of the type of gear box is the separation of the orders should be maximized to prevent the real parts of the frequency response functions from summing together. By reviewing orders, one is looking more closely to the peak of the forcing function. Shifting the orders by several times the modal damping ratio is best. A typical damping ratio is heavily dependent on the bearing structure, assuming the assembly is constructed of a rolling element, such as ball, roller, tapered bearing of some sort, the shafts of interest is likely to have 2 to 3% damping. So shifting the orders from 8-12% is probably good enough in nearly all cases, but further is best. Many shafts will only have 1% damping or less, so in those cases proportionally lower limit may work well. If a prototype exists, understanding the measured gear box frequency response function may help substantially.
Now to the second part, why is it set so far away? Aligning multiple shaft forcing functions can cause premature wear as a result of the resonance that is being driven. It can also create extra noise in a cabin of automobile. Noise a large contributor to warranty returns, to the tune of millions of dollars in warranty annual for automakers.